
Machine Manufacturing Operations with Odoo 15
Simply said, manufacturing is the process of putting disparate parts together to create a final product. However, due to the numerous types of components and methods involved, finishing the production process is a challenging operation. In each operation, we must inspect the quality of the made product as well as maintain and repair the used equipment.
Depending on the raw material used, the activities performed, and the final product produced, manufacturing functions differently for different types of enterprises. And each has its own set of criteria and risks. The Manufacturing module in Odoo manages the entire process.

Manufacturing is a difficult task; we must complete various procedures in order to complete the assignment. As a result, we'll need a workspace to finish the production process. In the manufacturing process, these workplaces are referred to as work centers, where we perform various tasks.
We must first build up a work center before we can use it.
Operations with Odoo 15
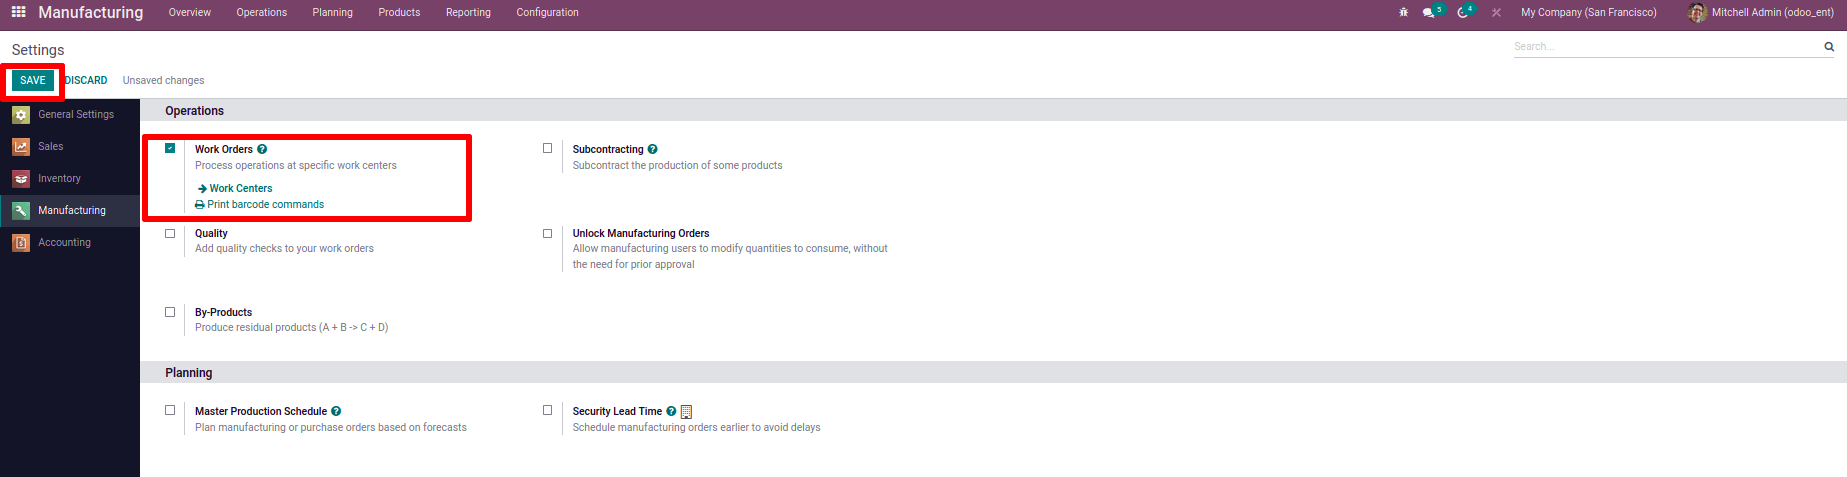
Odoo Manufacturing Module > Configuration > Settings > Work Orders > Work Centers
The work center option is then found under the configuration tab. Choose a work center from the drop-down menu; previously created work centers will appear. Click the Create button to start building our own work center for our manufacturing.

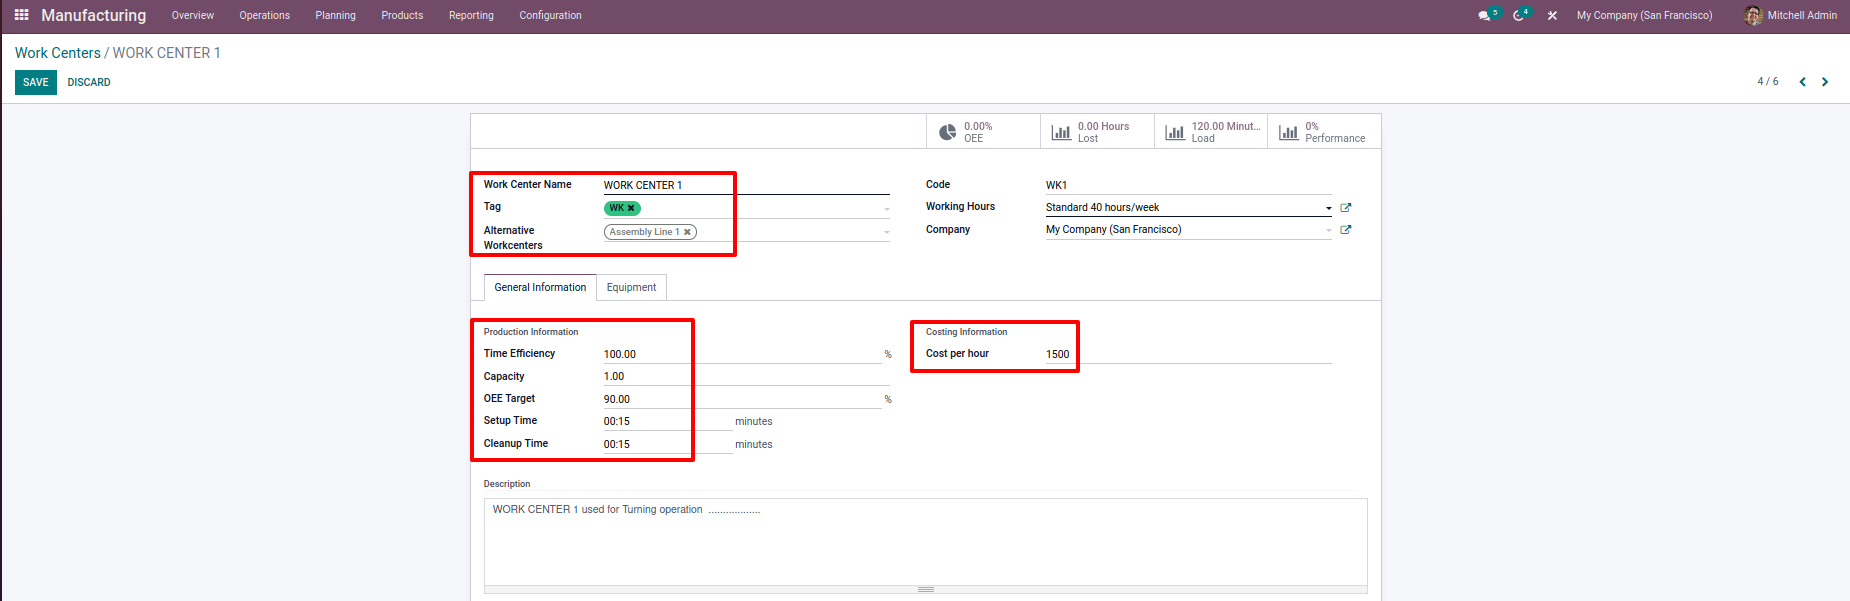
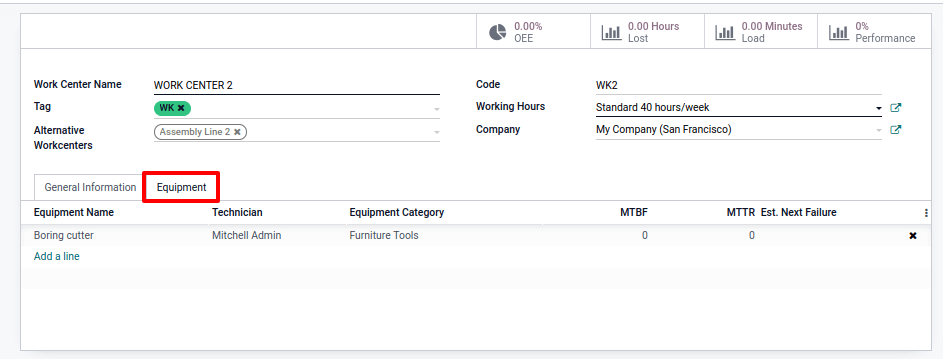
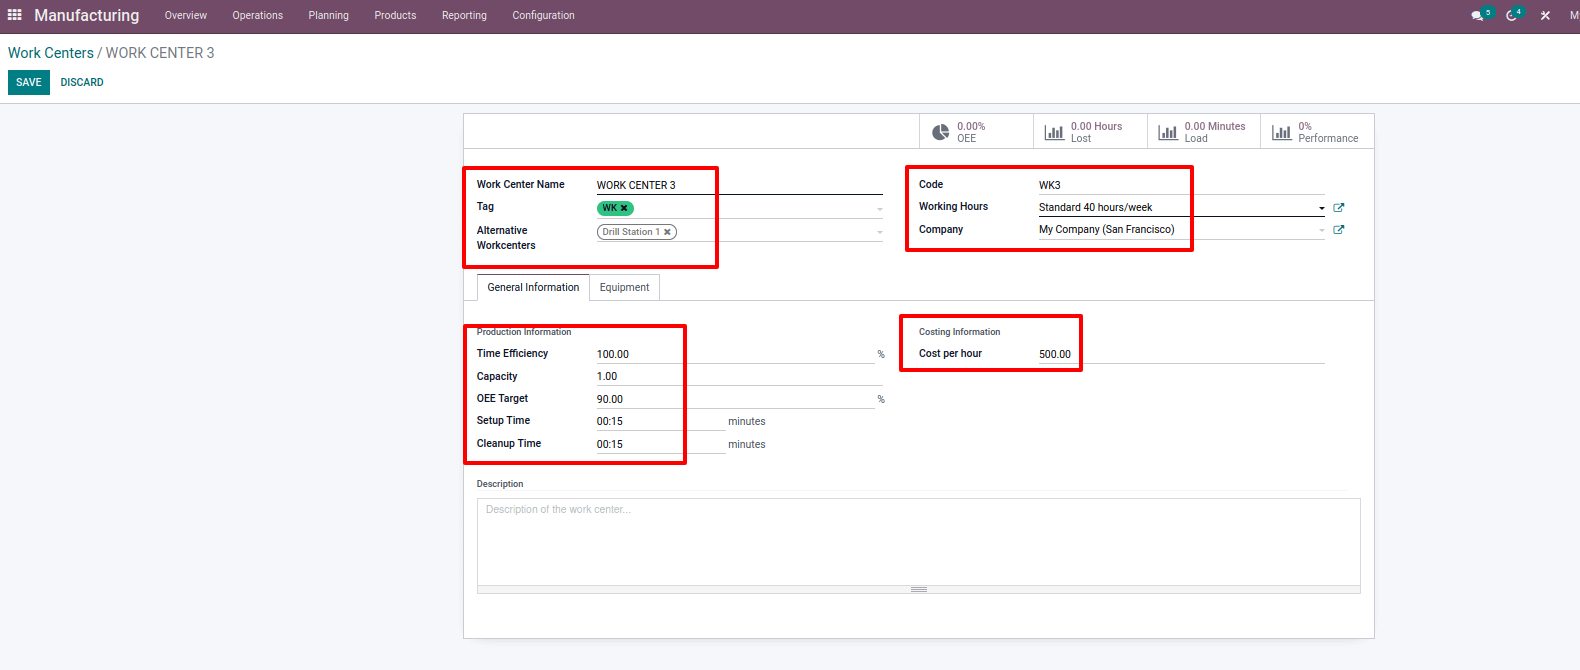
When creating a new Work Center, we must add information such as the Name, Alternative Work Center, Tag, Code, Working Hours, Company, General Information, and Equipment specifications.
Alternative Work Center: When the primary work center is overwhelmed or experiencing technological difficulties, this work center might be used for operations.
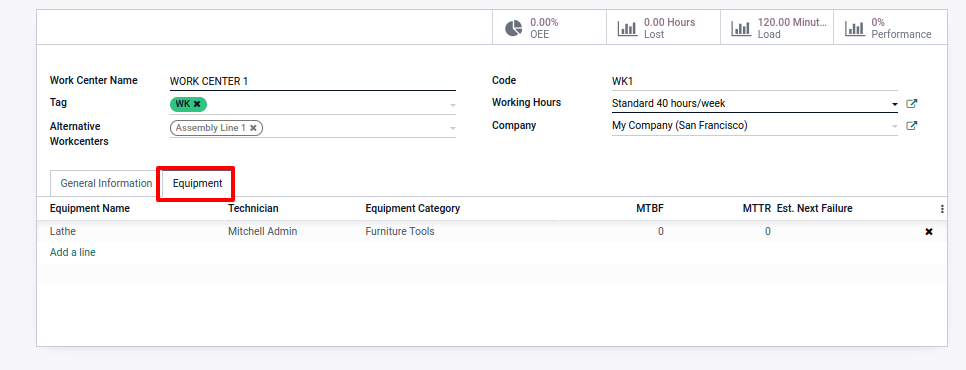
Three labor centers are being established here to perform three distinct procedures. Work center 1, Work center 2, and Work center 3 are the three work centers. Work center 1 (code WK1) costs 1500 per hour and takes 15 minutes to set up and clean up. In the equipment field, an alternate work center with an assembly line and a lathe was added.
Machine Manufacturing Operations with Odoo 15
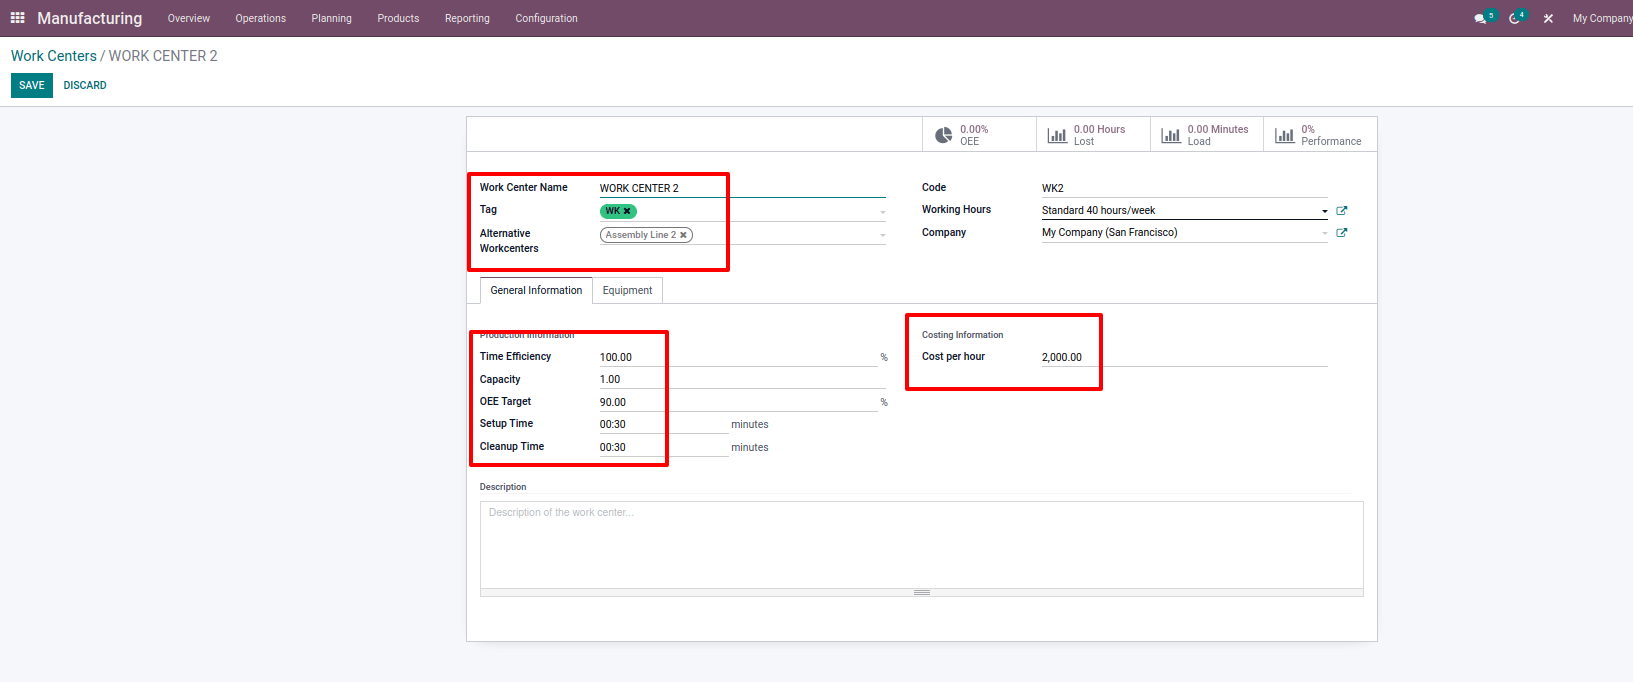
Work Center 2 takes 30 minutes to set up and clean up, with an hourly cost of 2,000 and the usage of a boring cutter. Assembly line 2 is an alternative labor center.
No equipment was utilized in work center 3, and cleanup and setup took 15 minutes. Drill station 1 is an alternative employment center.
BOM (Bill of Material)
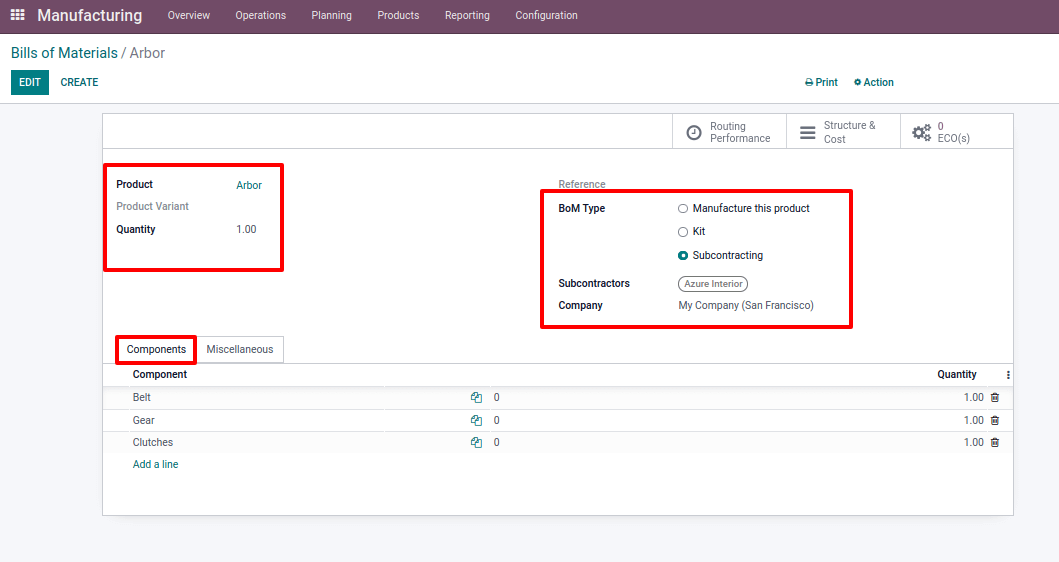
Before a product can be constructed, a bill of material must be created. In a bill of material, we can include components used in the manufacturing process as well as actions to be performed during the manufacturing process. We may create three distinct types of bills of materials from here.
Subcontracting is a term that refers to the process of hiring, we can outsource some of our items if we are unable to make them completely in-house. We can do this by placing a subcontracting order.
Configuration > Settings > Subcontracting and enable Subcontracting and then click Save.
Add a subcontractor to the BoM, and enable route 'buy' and a vendor who is also included in the product's purchasing tab for product 'Arbor.' Routes 'Resupply Subcontractor on Order' must be activated in the product form under the inventory tab for the components. Once you've completed adding components, save the page.
When the merchandise is delivered, you should make a receipt confirmation.
Product information, components, and operations should all be included in the manufacturing process description. There is a field for adding Consumed operations, which allows us to define which operation a particular component was utilized in.
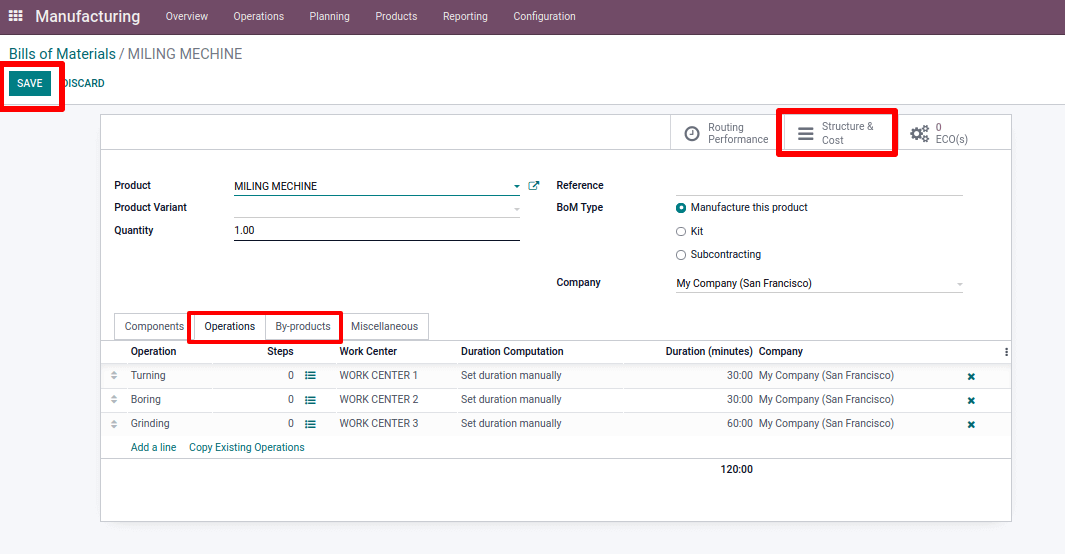
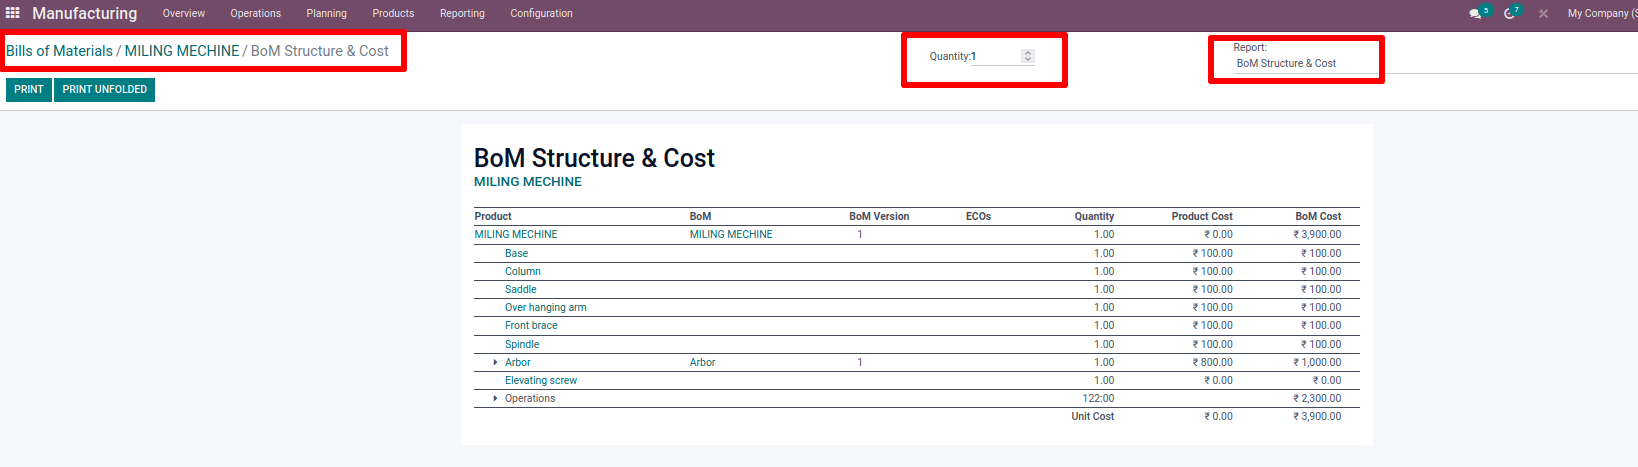
After that, save it. After saving, you may easily estimate the structure and cost of a bill of material for many products using the smart tab.
After each action is done, we can utilize the Odoo quality module to assess product quality. In order to add quality checks, we need to build quality control points.
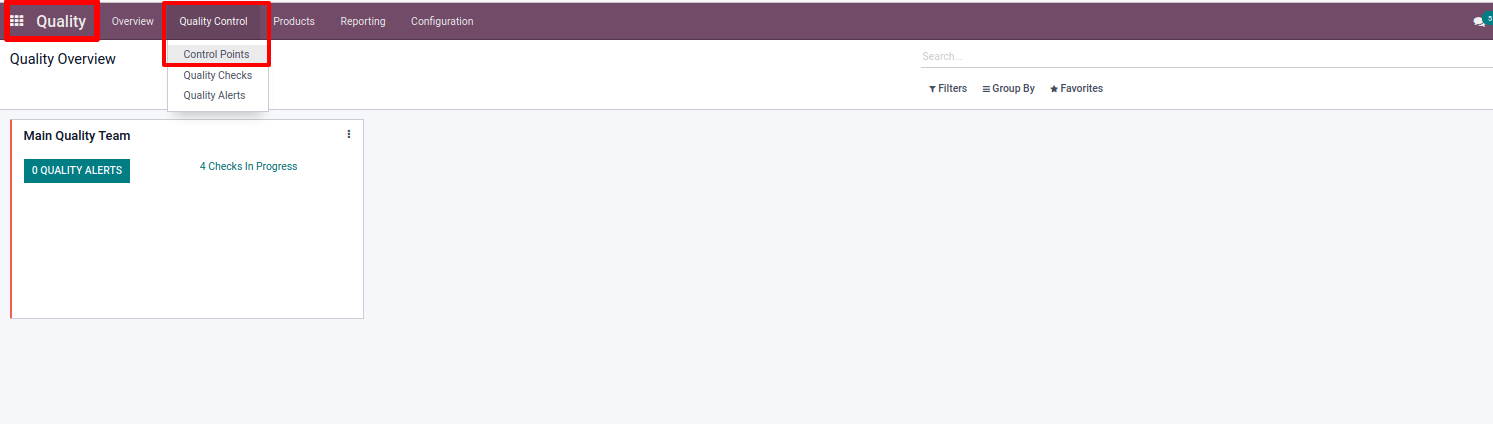
Quality Module > Quality Control > Control Points
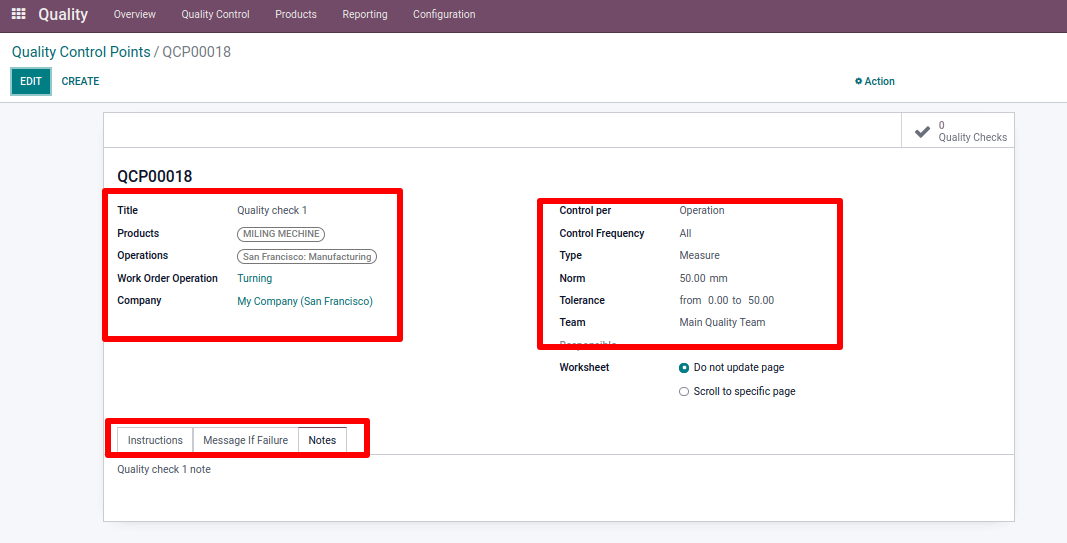
Quality checks can be developed for both the final product and the procedures. Quality checks come in a variety of forms, including pass/fail, take a picture, measure, and so on. For the initial operation, Quality check 1 is incorporated on the basis of measurement. We can add quality instructions, a failure notice, and some further details.
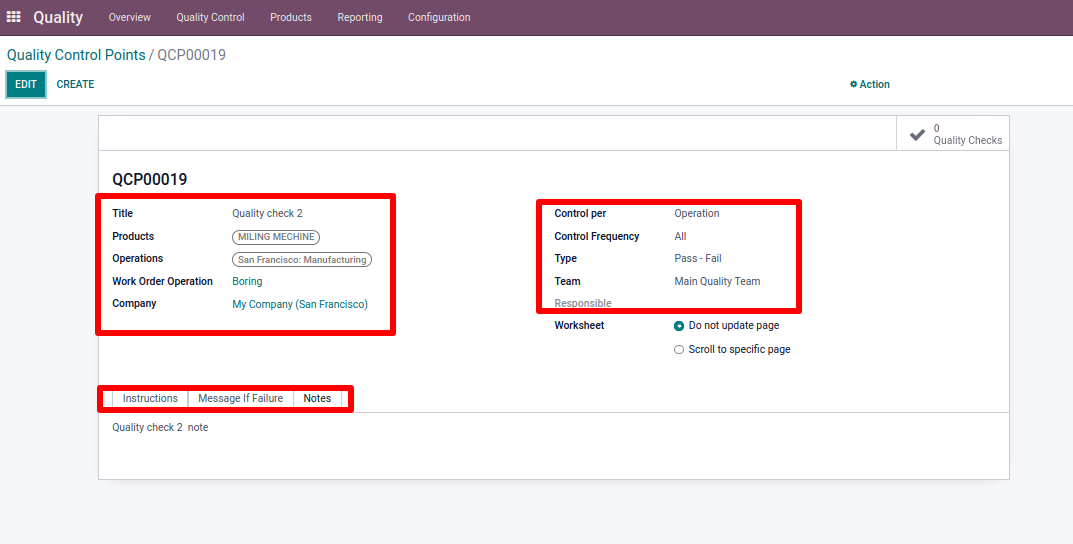
The second quality check, which is either a pass or a fail, is for the second operation. We can add quality instructions, a failure notice, and some further details.
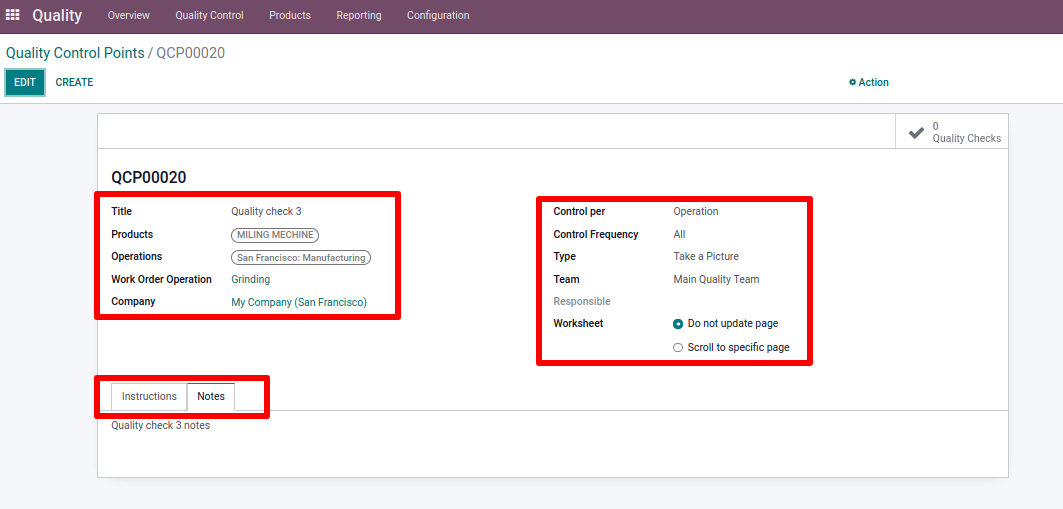
The third and last quality check is for the uploading of a photo of the finished product, which is the final operation. We can provide clear instructions as well as some additional details.
Machine Manufacturing Operations with Odoo 15
Order for Production
After creating a bill of materials in manufacturing, the following step is to create a manufacturing order. To do so, choose the production order from the Operations page. Then click on the create button after accessing the Manufacturing Order Page.

Operations > Manufacturing Order
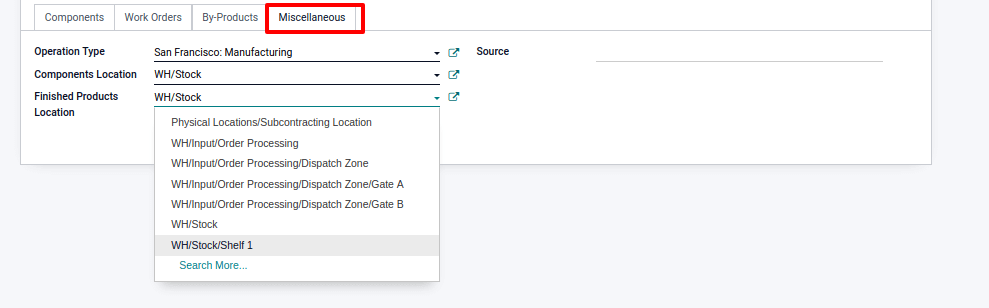
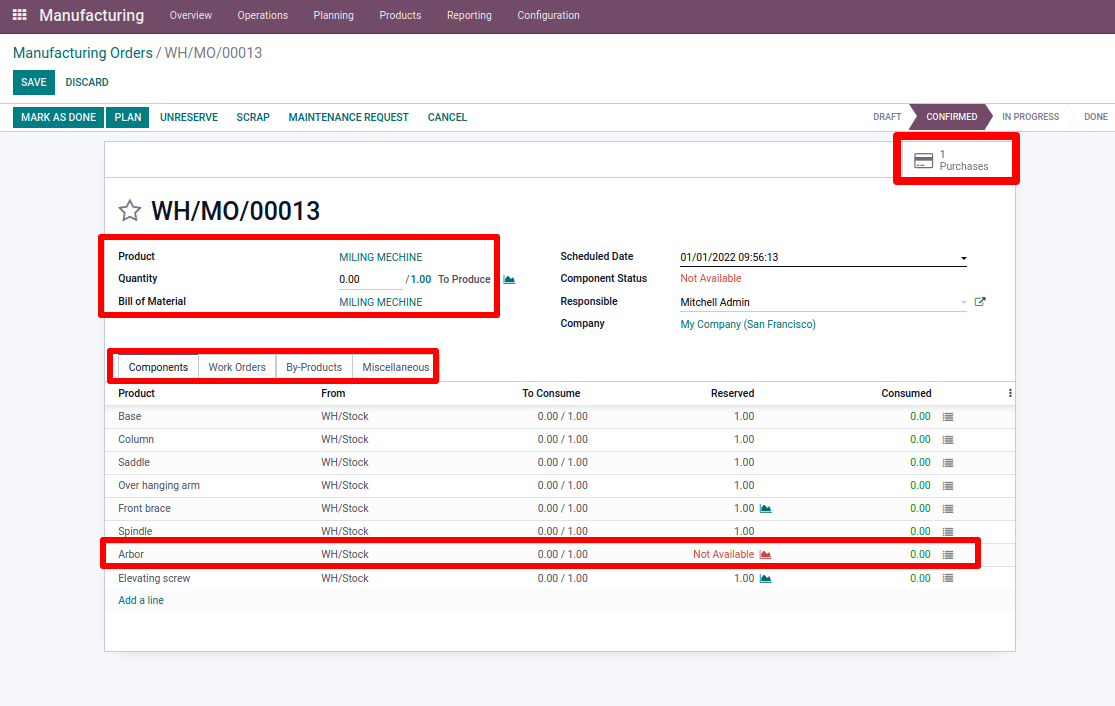
To create a manufacturing order, enter the product name and bill of materials. The bill of material's components and processes are then automatically inserted. It is mentioned in the miscellaneous tab's operation type, and the product storage location is the same as that specified in the operation type. It can also adjust the destination's location by picking it from a drop-down menu.
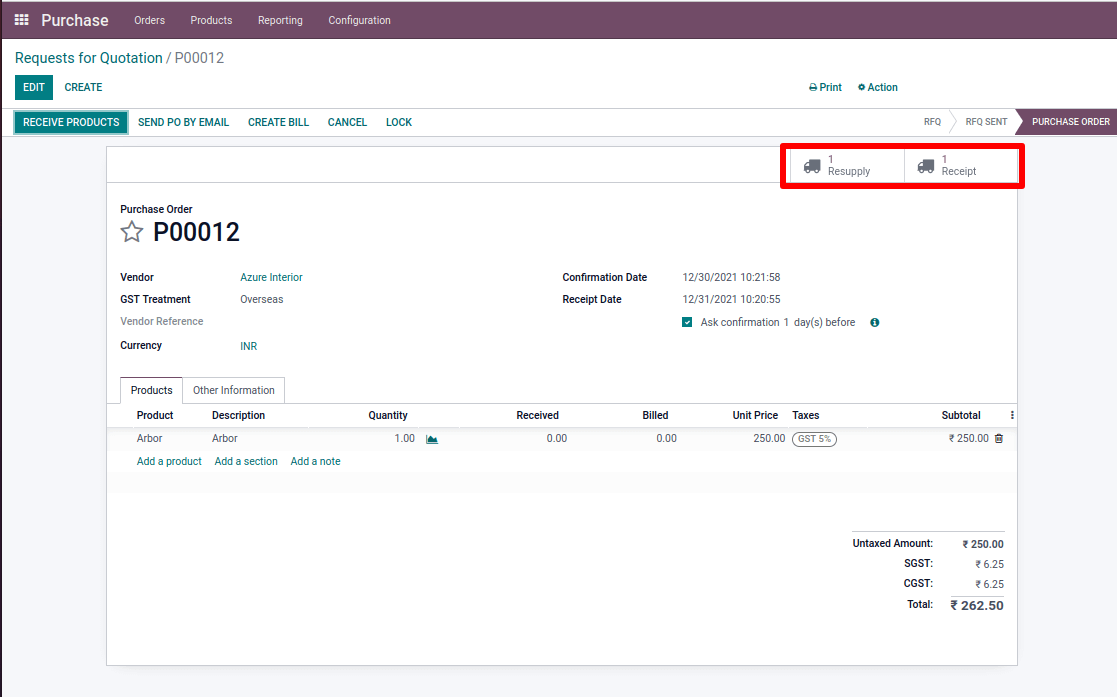
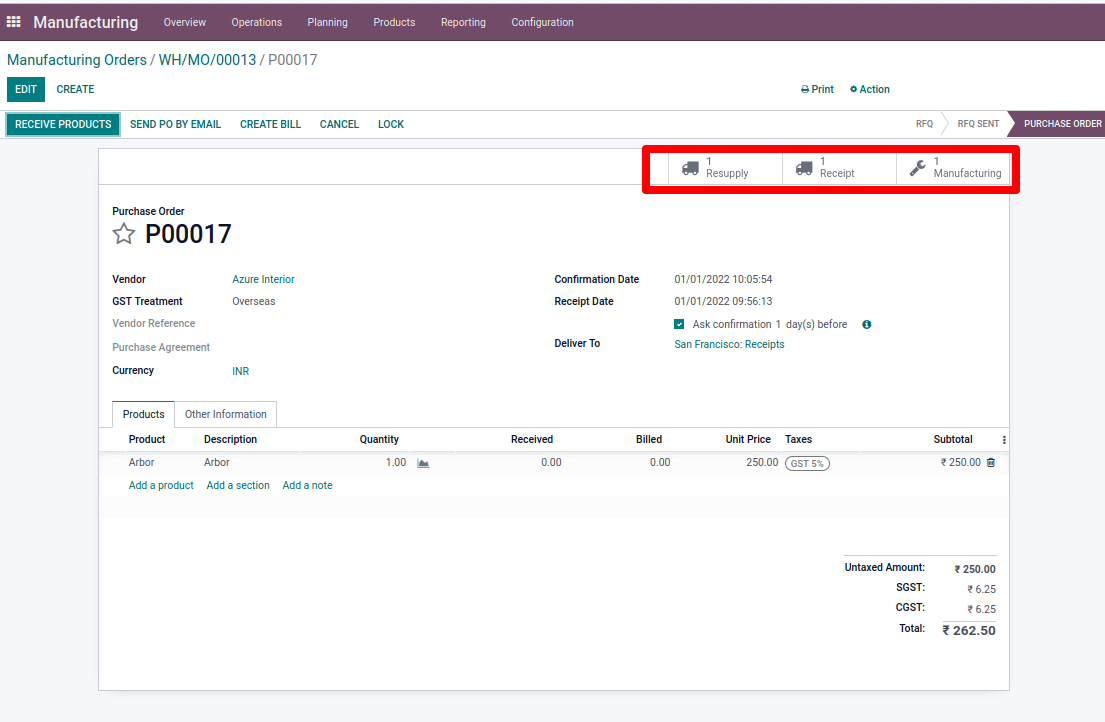
'Arbor' is a missing component. Arbor receives a purchase order after the order is confirmed, which may be viewed in the smart tab. Open the purchase RFQ and confirm it.
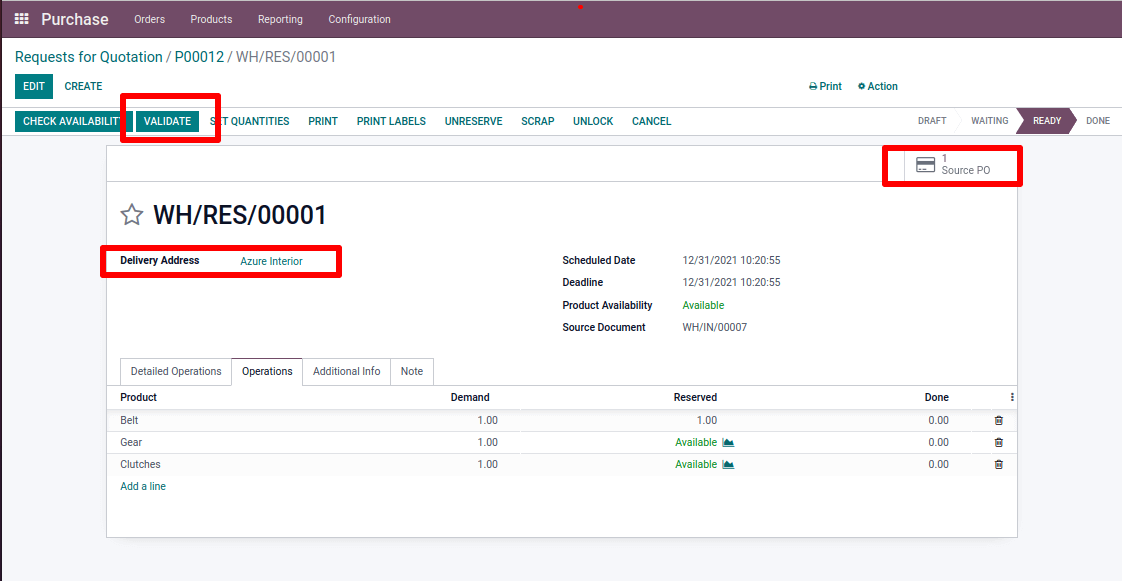
Resupply and a receipt are set up in the smart tab since we need to send components to the subcontractor first.
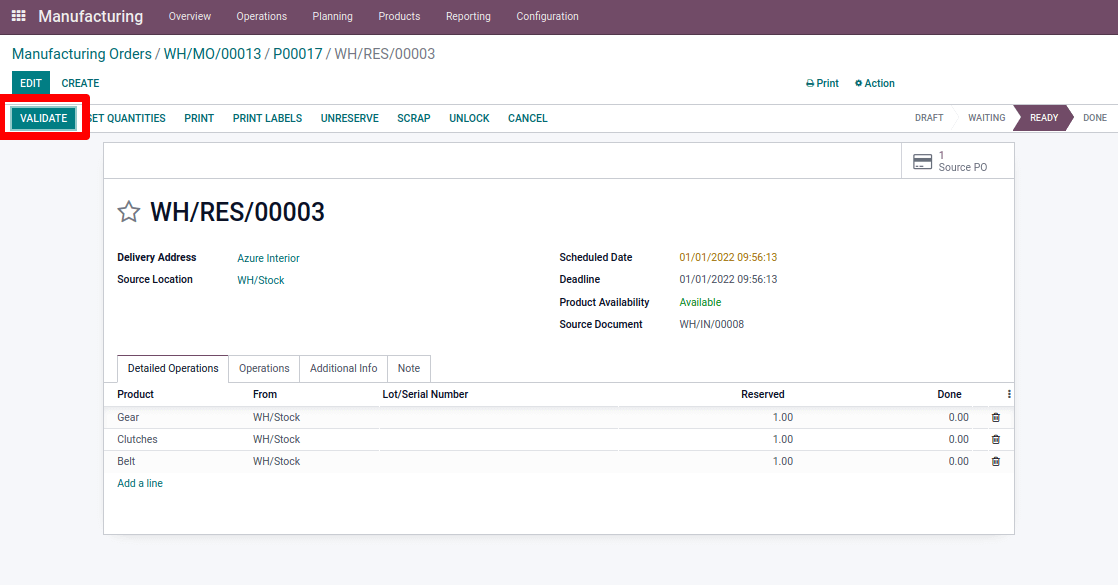
Validate the replenishment now. As a result, the vendor must be supplied with the product that is required to make the main product.
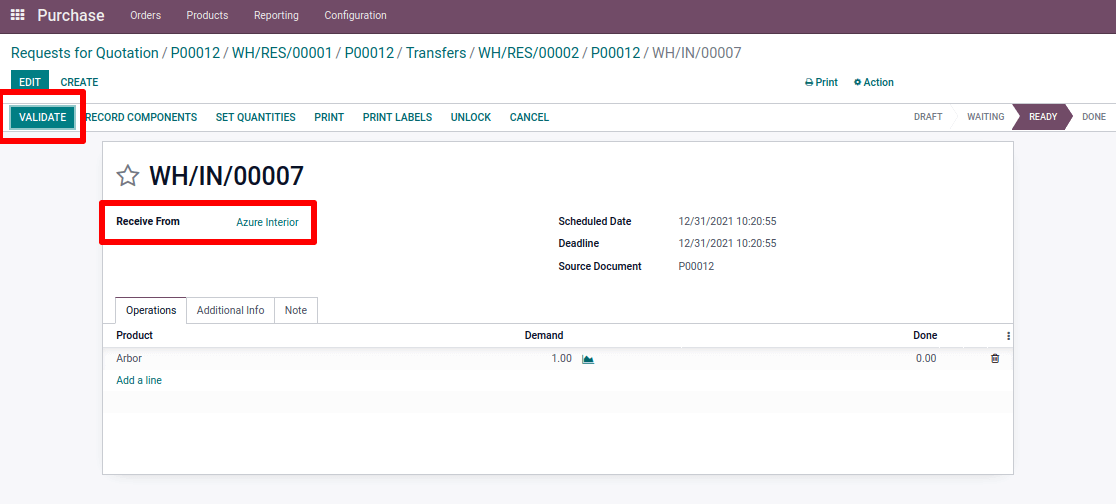
You should receive the product once the vendor or subcontractor sends over the finished products.

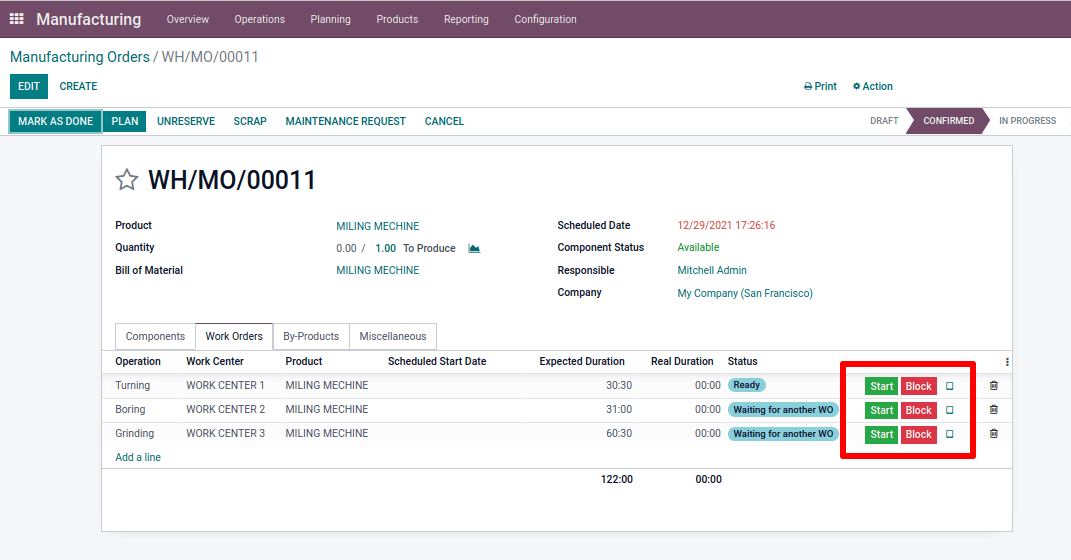
After that, the manufacturing order is ready to be filled. We can start the process by pressing the start button. Furthermore, there is a mobile view that can be accessed using mobile devices, giving you complete operational control over production activities even while you are away from the office.
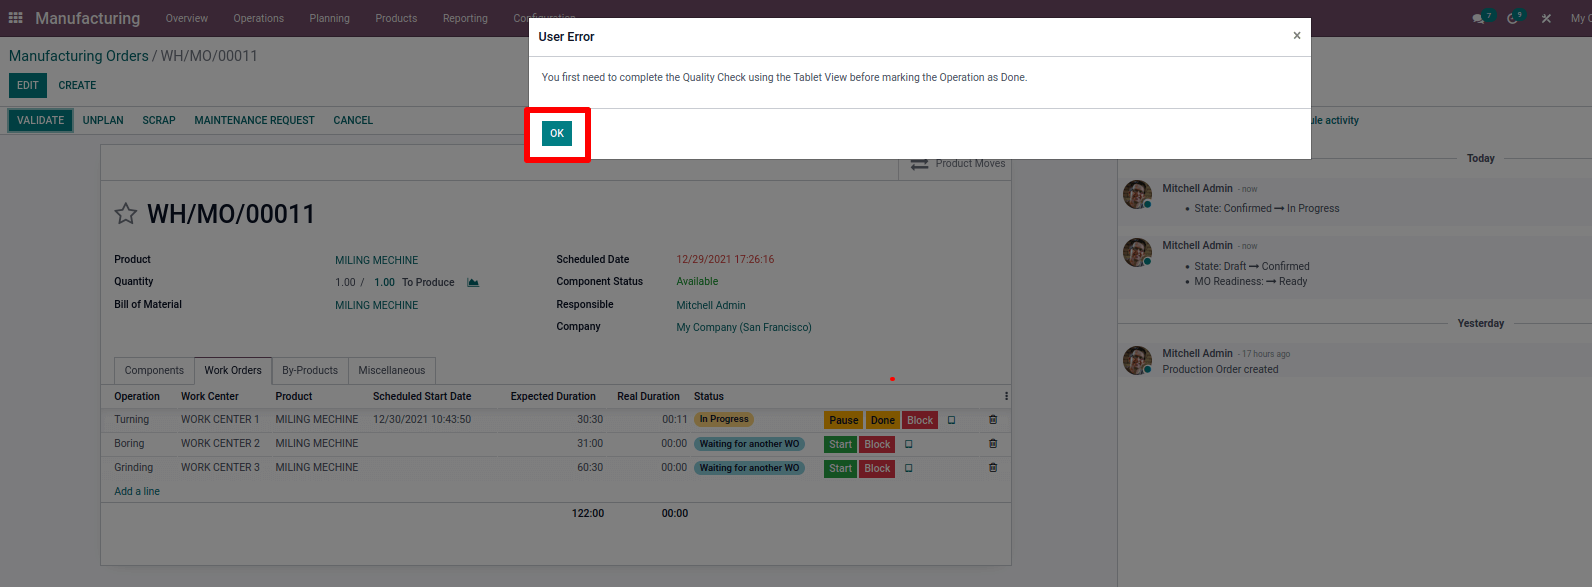
We must double-check the quality that we added before before we end the process. A popup notification comes when we try to end the procedure before the quality check, as shown in the screenshot below.
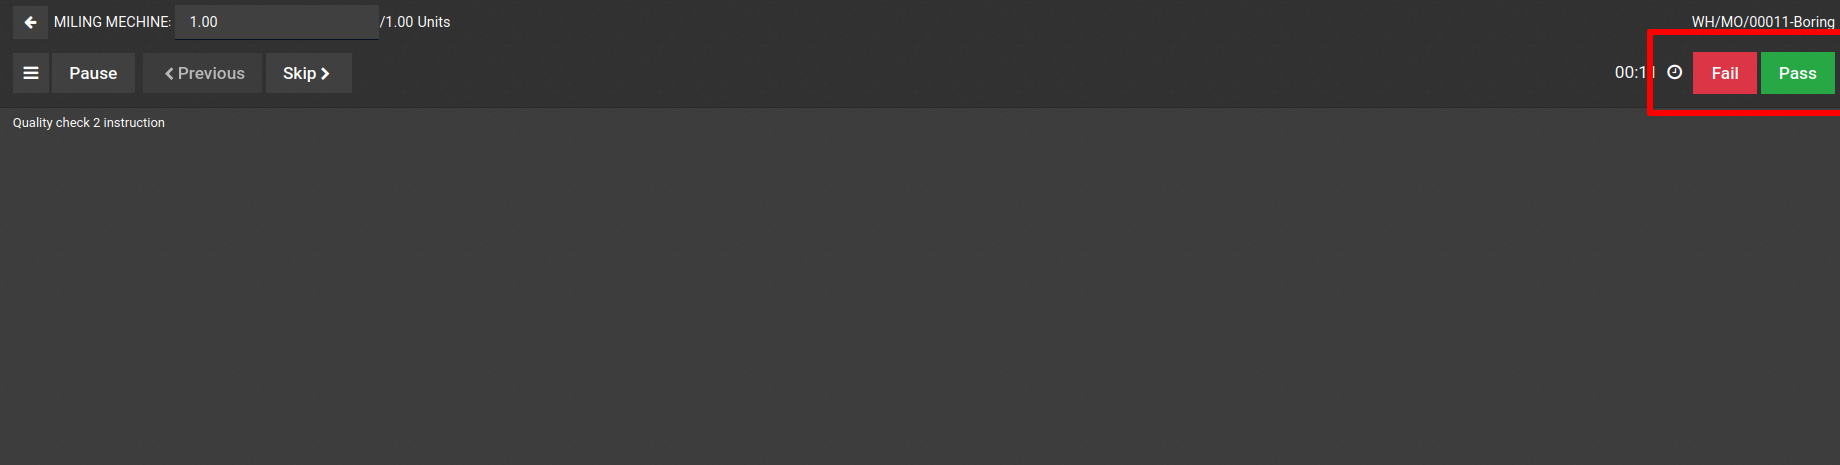
To the initial operation, we added a quality control measure and measurement. We can perform the second operation as a pass or fail after testing quality.
Third, snap a photo of the item and verify it.

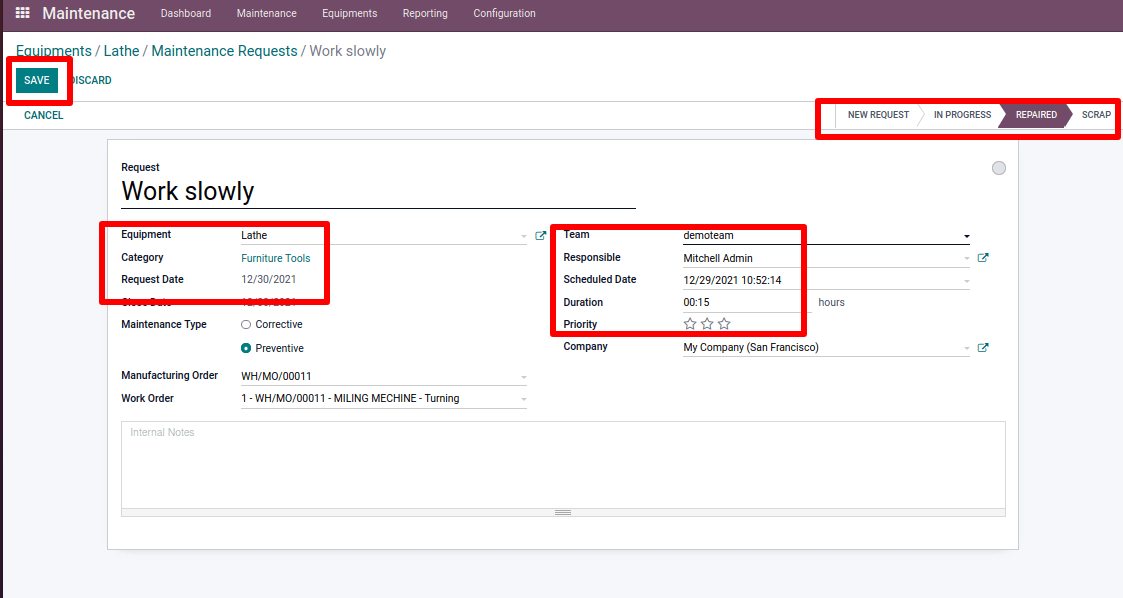
There's also a smartphone version where we can add a lot of information. Bolt was added as a byproduct, followed by a maintenance request.
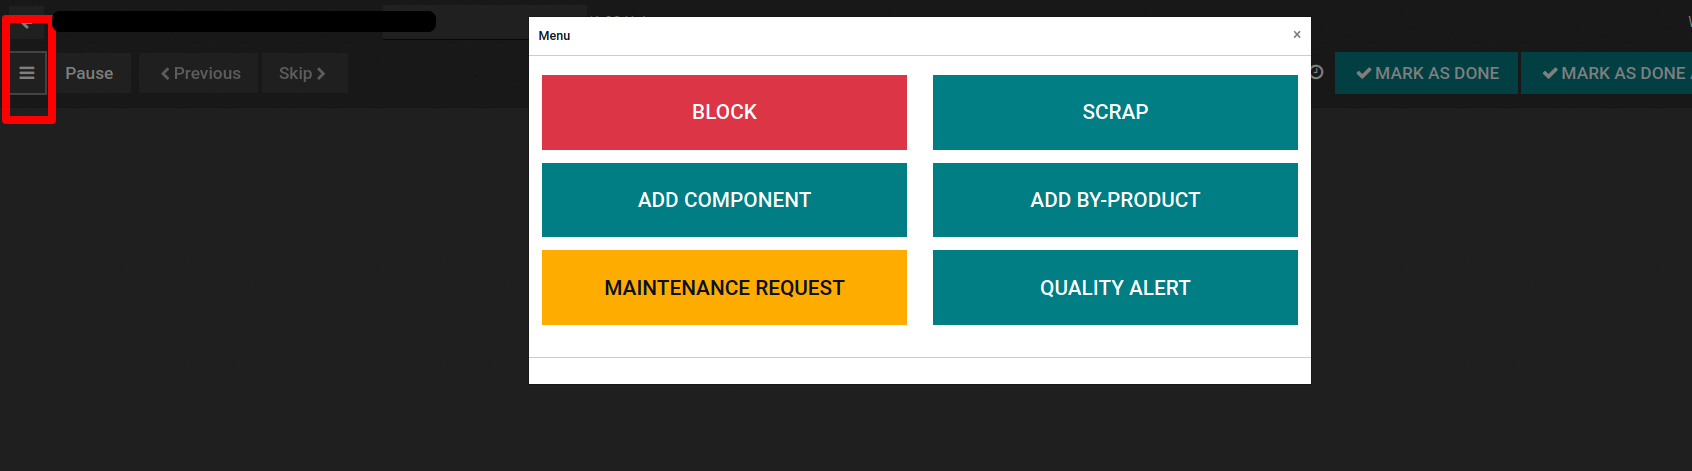
The steps of a maintenance order can be changed from New Request to Repaired, or the Equipment can be scrapped.
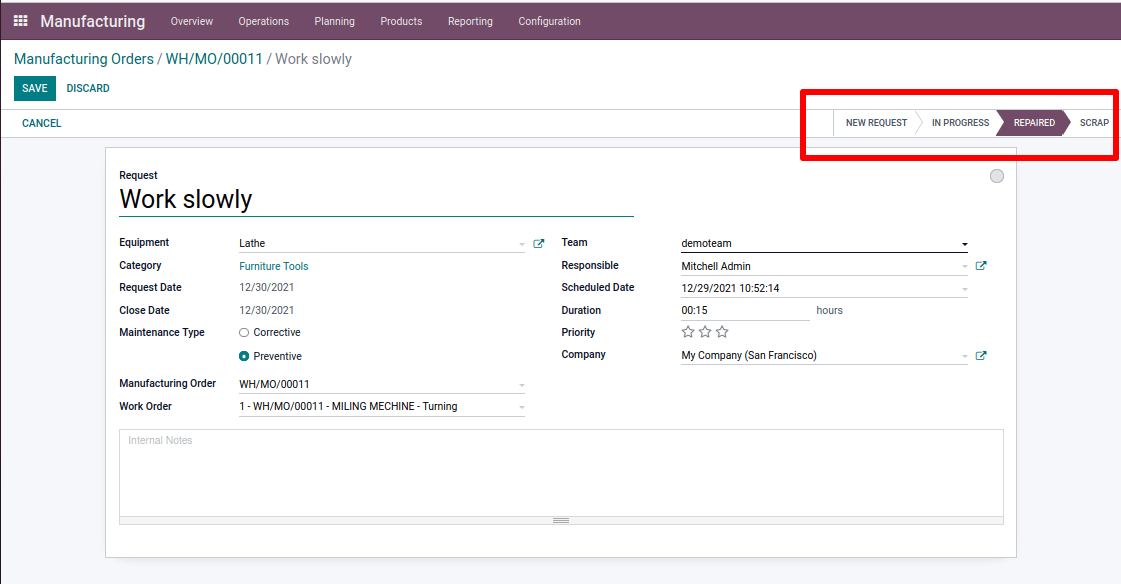
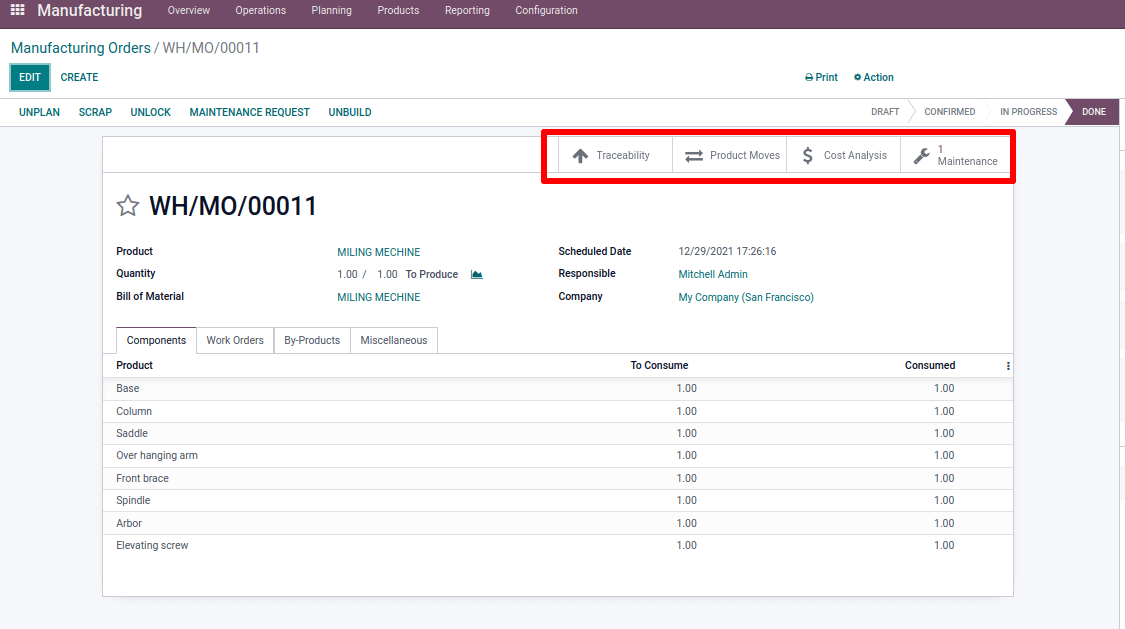
After that, we may select Indicate as Done to mark the order as completed. Through the smart tab, we may collect product movement, traceability, cost analysis, and the created maintenance request.
The maintenance of old equipment is a crucial part of the production process. With the help of the Odoo maintenance module, we can correctly maintain our equipment. As previously described, a maintenance request can be added to a production order. This can also be done through a different module called Maintenance.

Under the setup tab, we may choose the maintenance team. We can create a new team by pressing the create button. Configuration > Maintenance Teams

After that, save it with the team members' names and the team's name.

By selecting machines and tools from the equipment option, we can see all of the equipment. Equipment> Machines and Tools.
Under the product details page, we can see the cost of an item as well as the effective date, which is the date the item became active. We can calculate the mean time between failures using this data and the effective date.
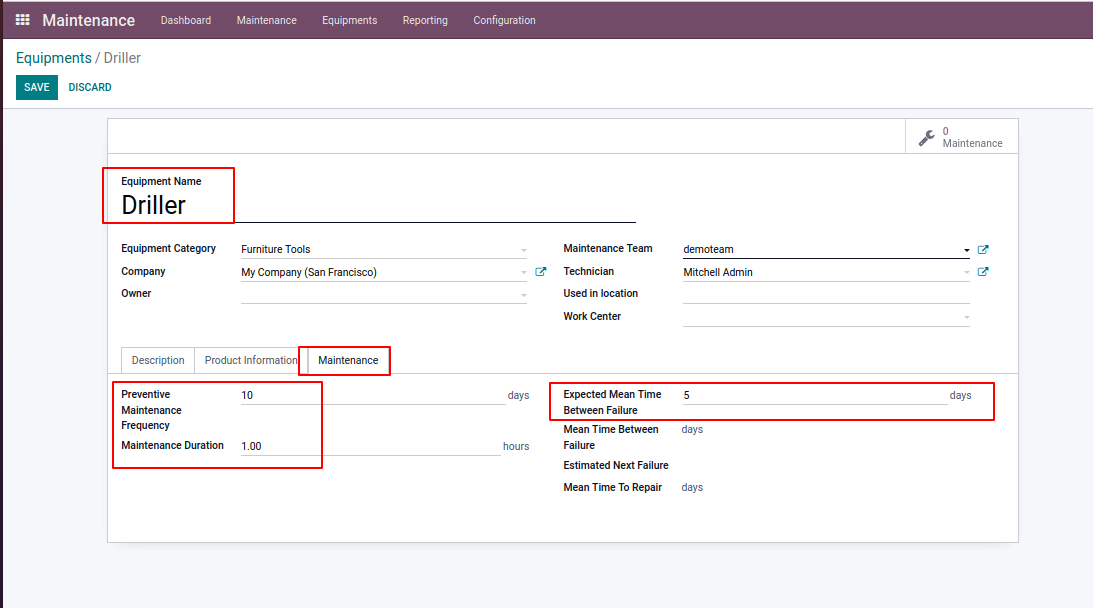
Under the maintenance tab, we may specify Preventive Maintenance Frequency, which is the number of days between preventive maintenance, and Maintenance Duration, which is the amount of time spent on the maintenance procedure. Expected Mean Time Between Failures (MTBF)
Create a maintenance request after that. The maintenance tab is where we receive maintenance requests and where we can create new ones.

We can make a request by supplying information about our equipment. Requests for maintenance fall into two kinds. The first is a corrective action, whereas the second is a preventative action. Preventive maintenance is carried out on a regular basis, whereas corrective maintenance is carried out only when the equipment fails. We can avoid unanticipated failures with preventive maintenance.
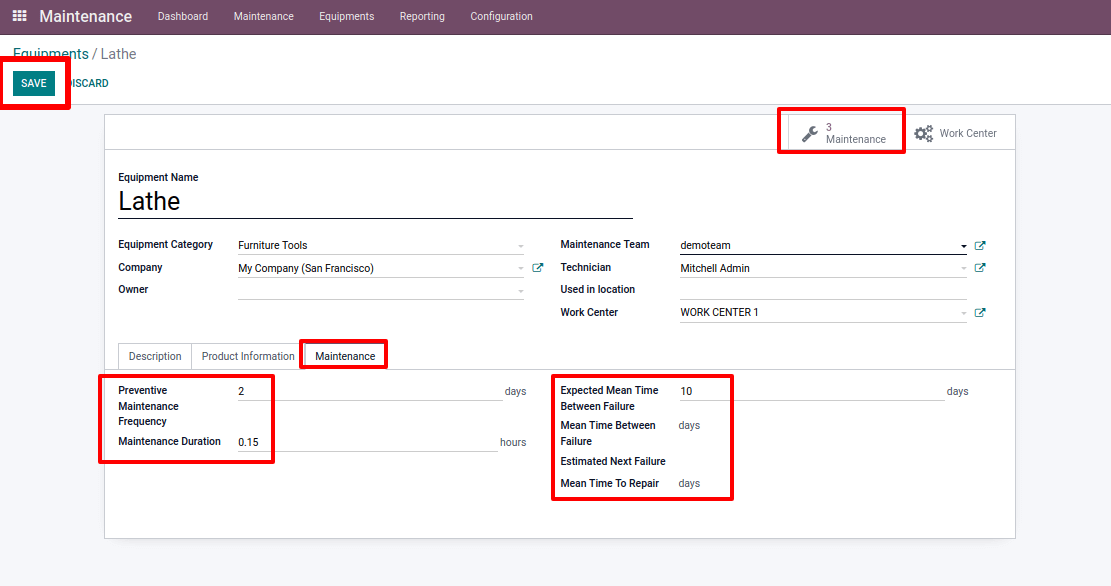
While reviewing the maintenance tab on our equipment, it was initially repaired. The items listed below have been updated: Preventive Maintenance Next, Mean Time Between Failures, and Next Failure Estimate.
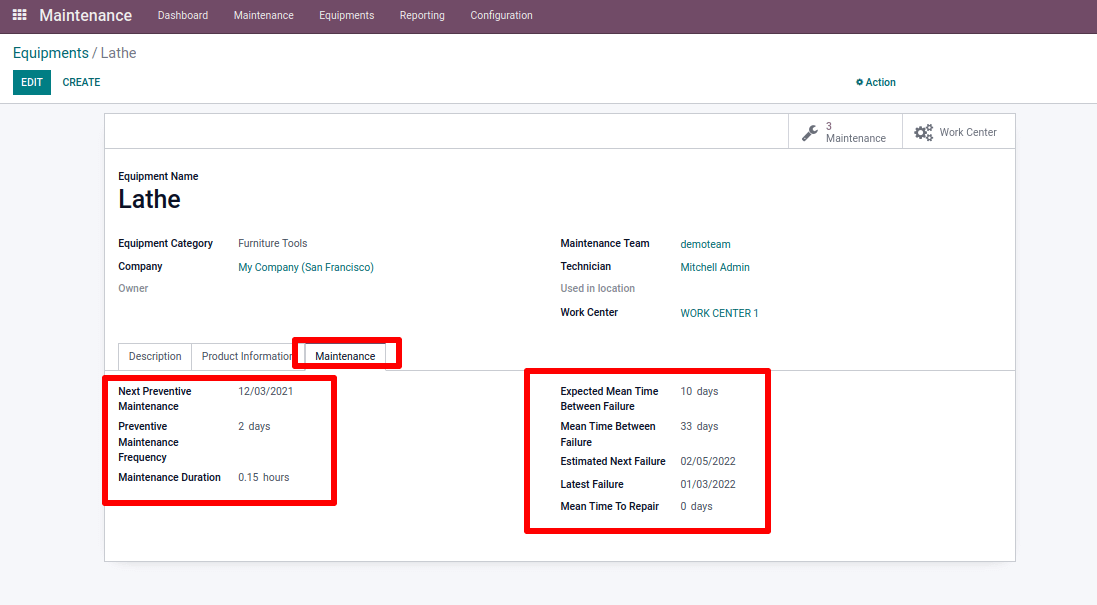
The estimated future failure is the sum of the most recent failure and the mean time between failures. The next preventive maintenance is the sum of the effective date and the preventive maintenance frequency. The most recent failure indicates the date of the equipment's most recent failure. We have the ability to disassemble manufactured goods. Select the unbuild option to do so.
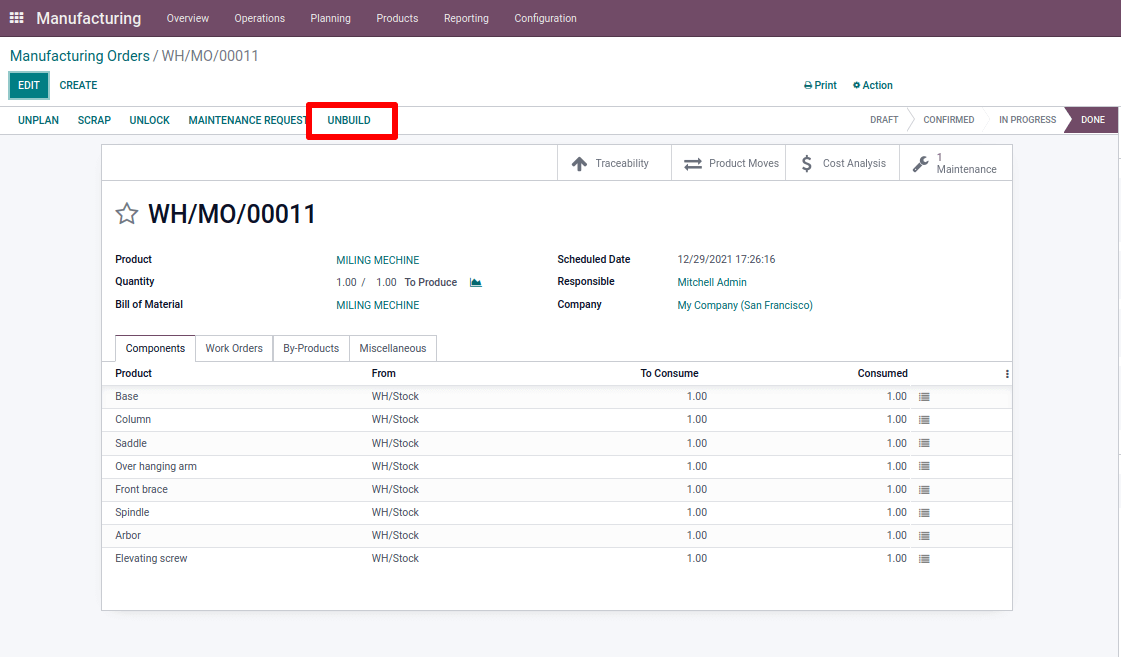
We can define which components should be taken and where they should be taken. Then choose the option to deconstruct.

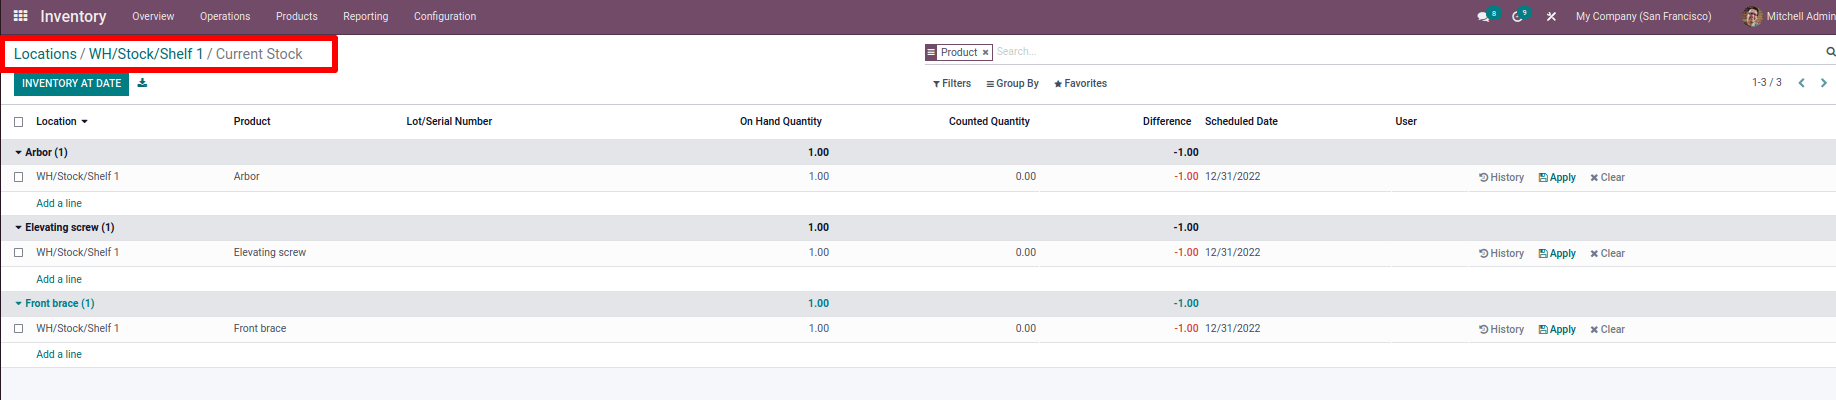
The stock is updated when we use the inventory module to verify the current stock of the target location.
We may use Product Recycling Management to trace the lifecycle of our product. It helps us maintain a high degree of quality while also increasing manufacturing efficiency.
Click on modifications to obtain an Engineering Change Order to make new adjustments or a new design to an existing product. We can see a list of new and previous modifications we've made from here. There's information about the components that have been changed, and so forth.
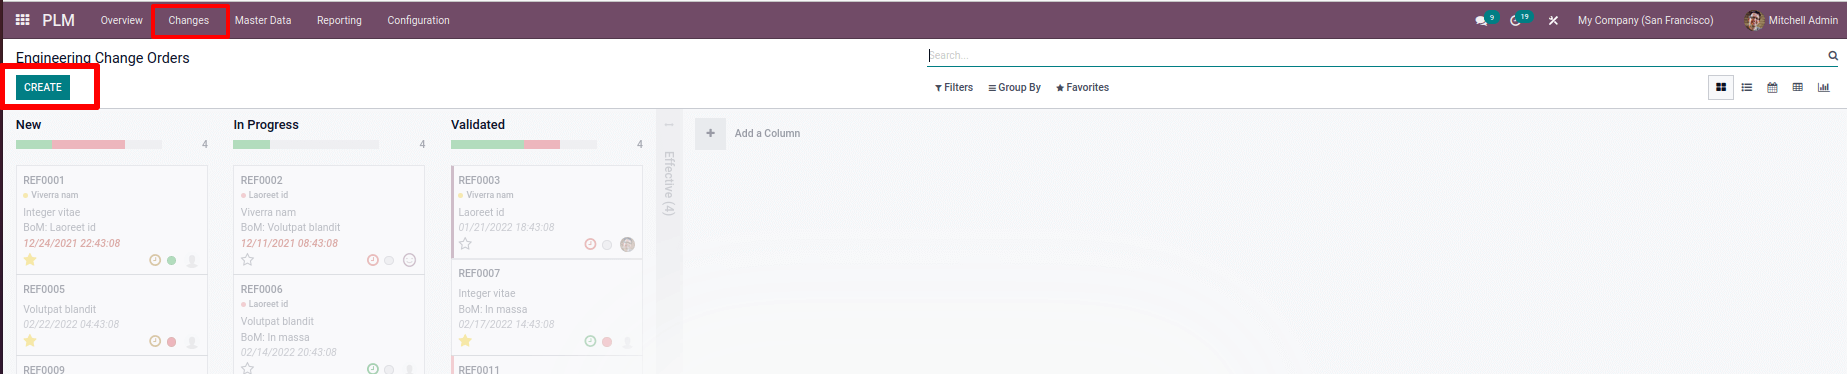
It can be utilized in the product or on the bill of materials. Add the name of the product that the change order will effect. There are two effective methods: implementing the change as soon as possible or implementing the change on a certain date.
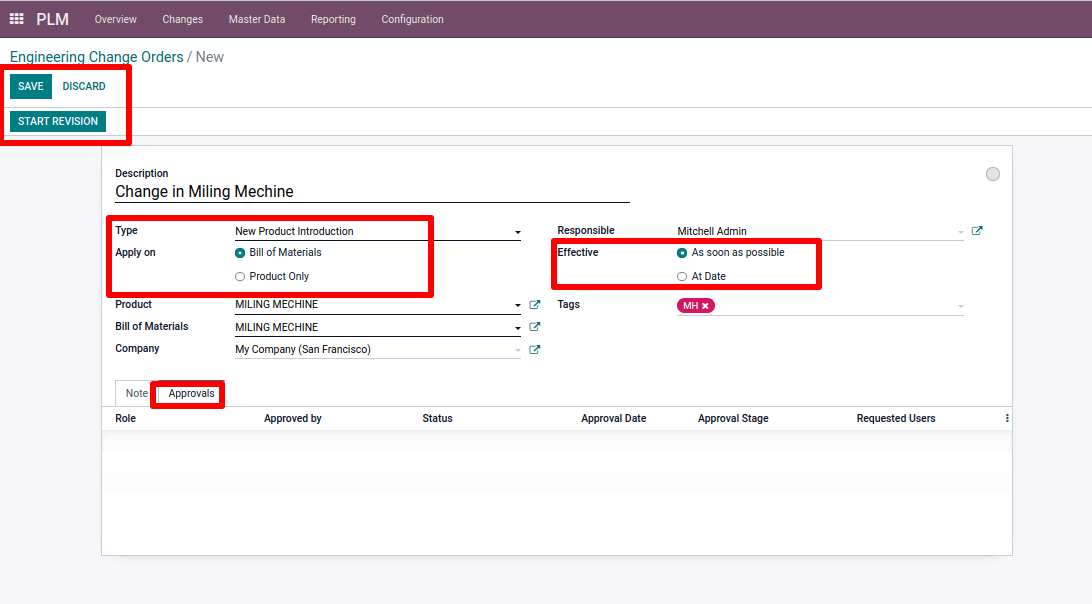
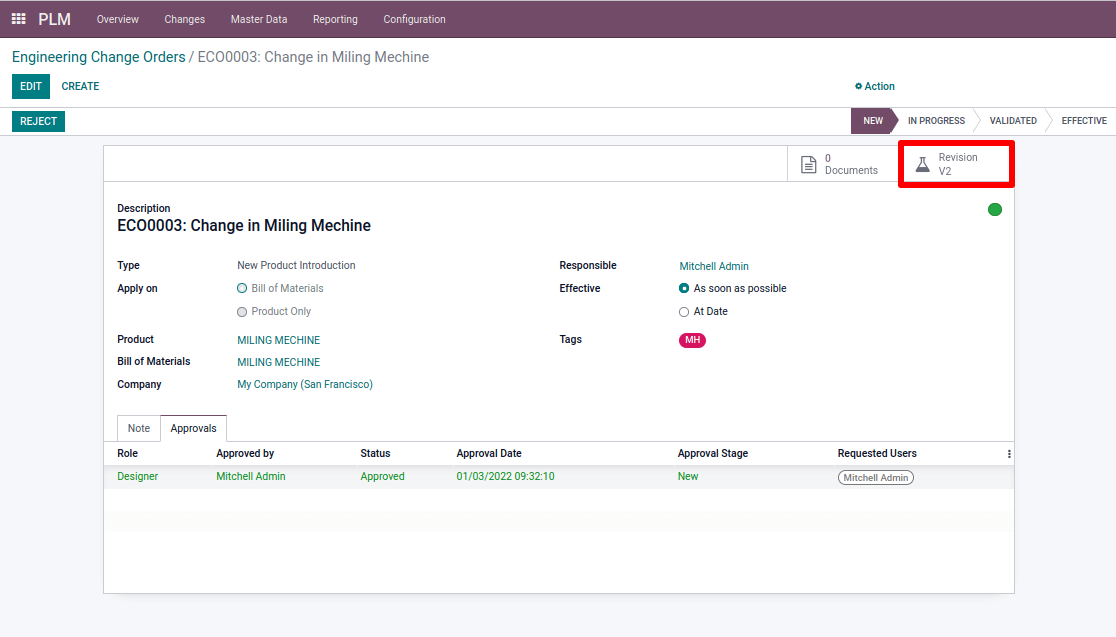
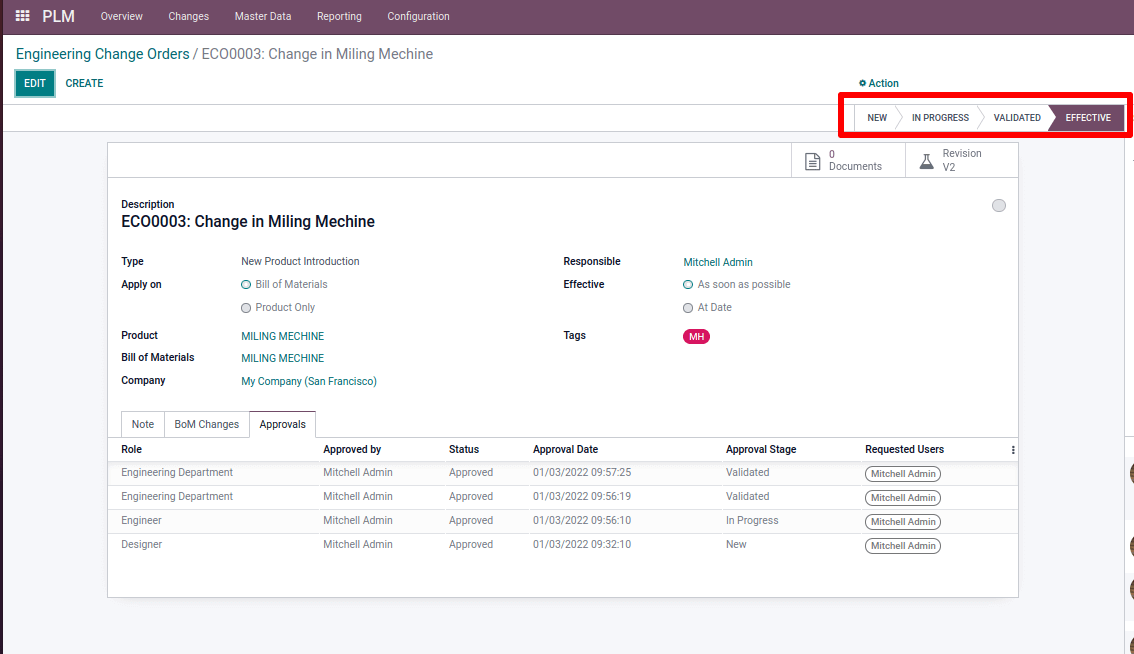
Save your work and begin the revision process. The approve or reject button is visible. When we check the approval tab, as well as the person in the specified role's approval. They can either accept or reject the change in these positions, which are assigned in stages. The smart tab has a Revision V2 option.
We can see the product's bill of material while picking this because we selected apply on a bill of material in ECO. From here, we can change the components.
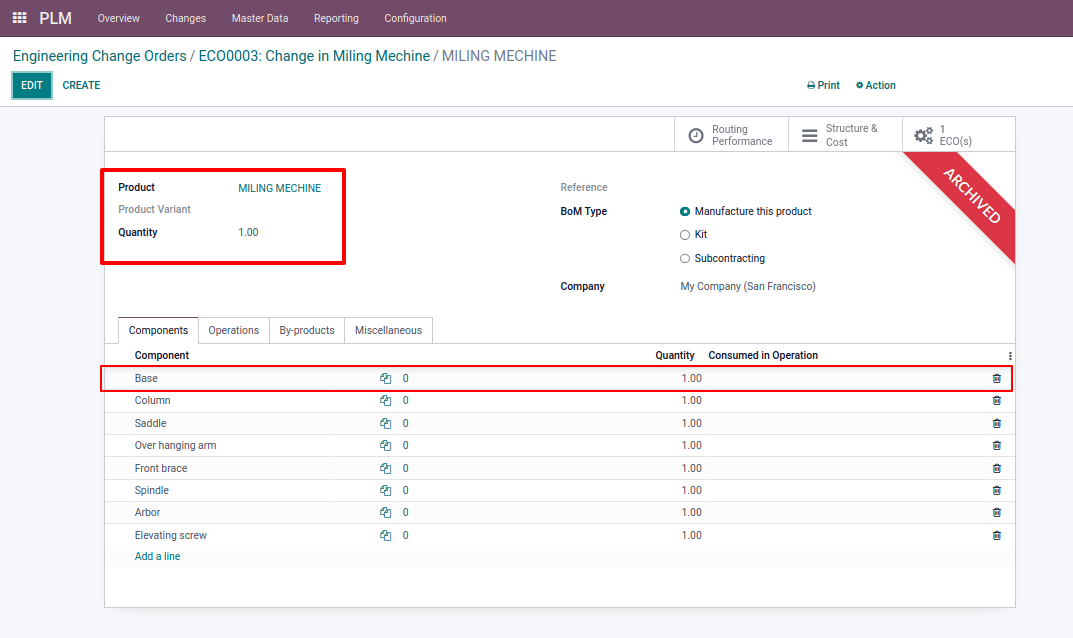
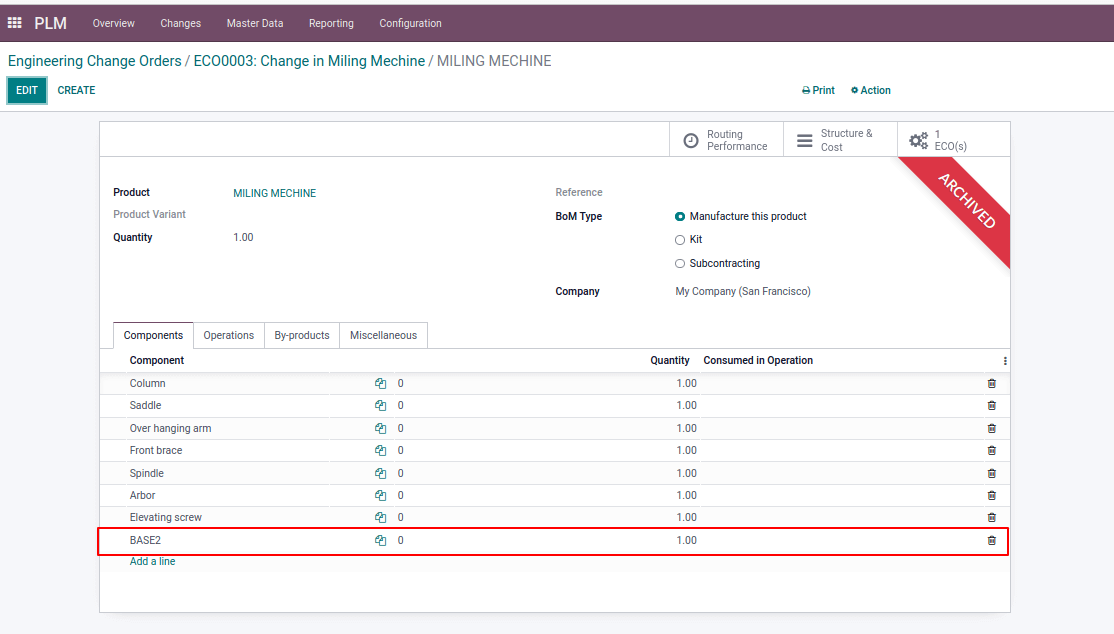
We're deleting the component Base and replacing it with BASE 2 to improve our product.
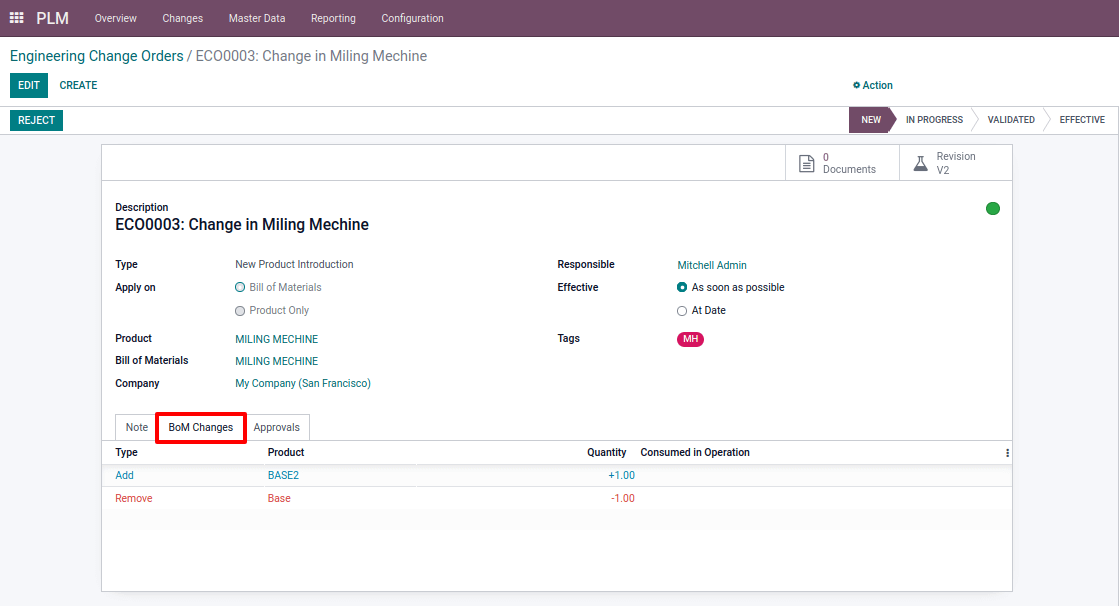
Getting back to ECO after saving, we can see that a new tab called BoM Changes has been added, which contains the details of the changes we made.
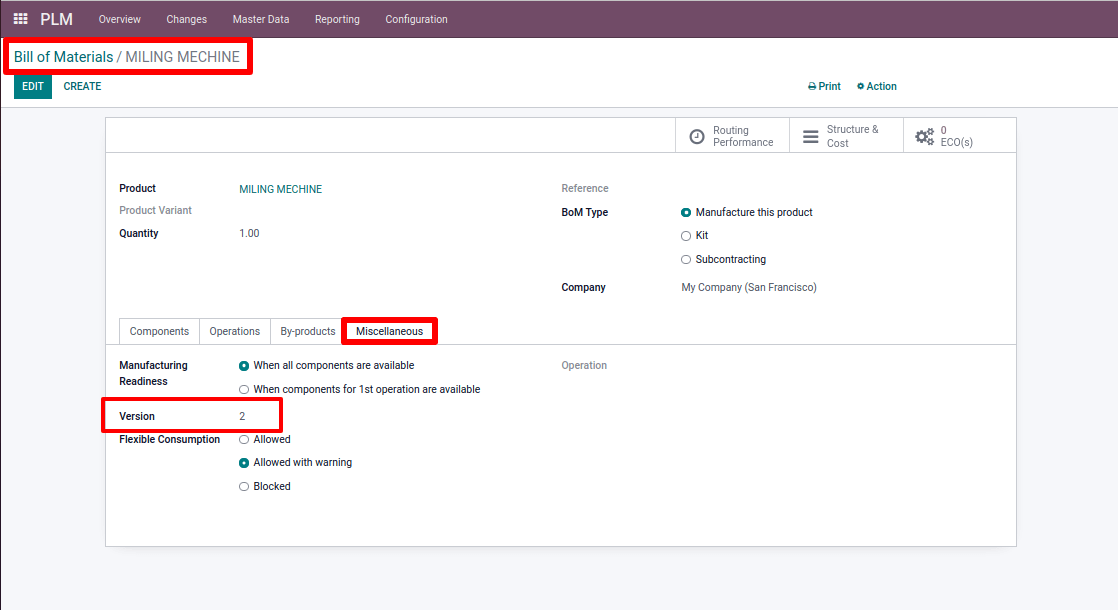
After all changes have been completed and all approvals have been received, the stage changes to effective. After that, the bill of materials version was changed to version 2.
Look at the product's bill of materials to double-check this Bill of Materials from Master Data.

Master Data > Bill of Materials
In the Miscellaneous tab, the version number has been updated.
It is also feasible to make changes to the product using ECO in PLM.
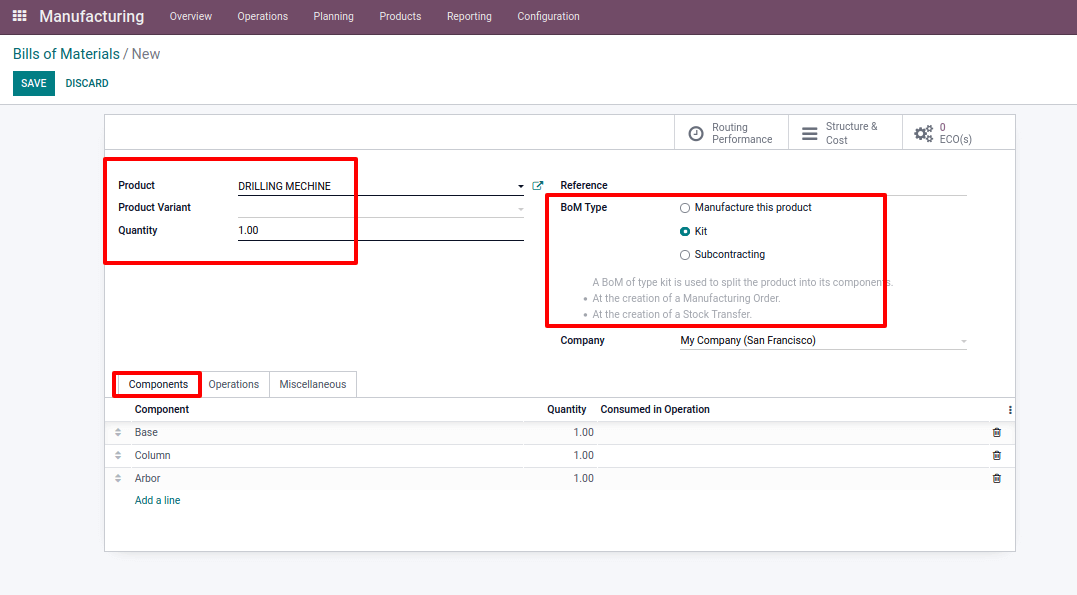
BoM Type Kit:
The BoM Type Kit enables you to sell many products at the same time while still being treated as a single entity. We must, for example, sell the mouse, keyboard, and other accessories when we sell a computer. All of these things are classified as a single unit in this case.
There may be a chance to put up the machine at the customer's location with various manufacturers, including machines. We must carry all components to that exact location in such circumstances, but they are viewed as a single unit. This is when the third bill of materials type kit comes in handy.
Make a bill of materials for a kit-style product. It is necessary to add components. After that, the bill will be stored and confirmed.
The product can then be sold and a sales order can be placed. Add the same product to your order line. Save and confirm the order. A delivery is then created on the smart tab.
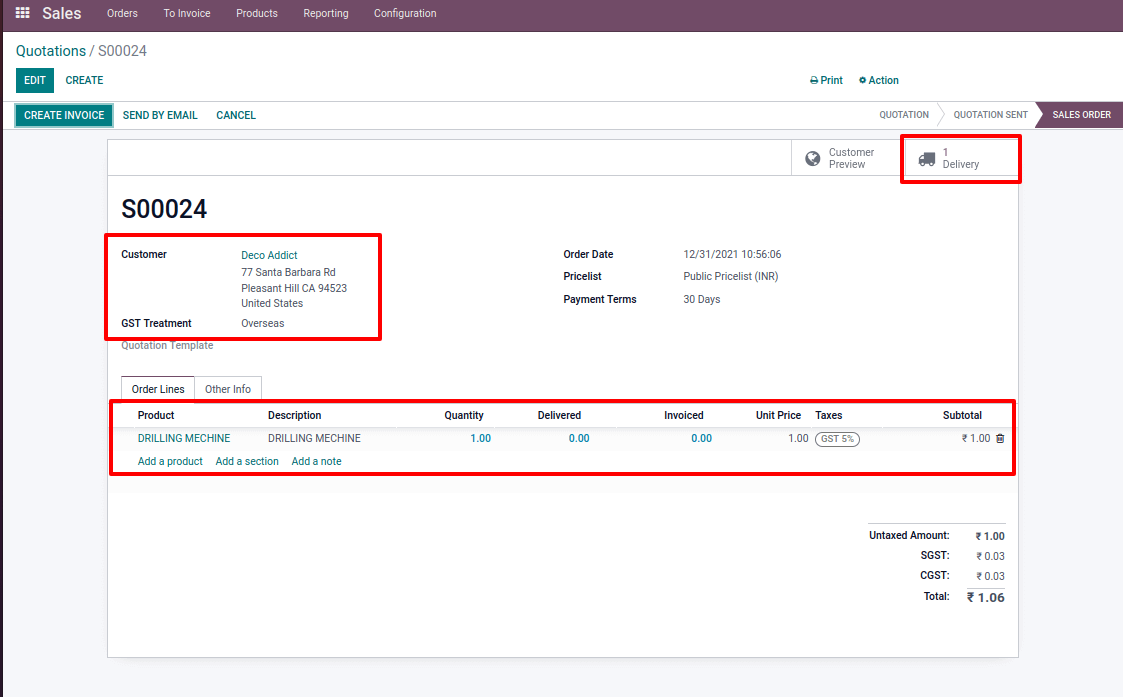
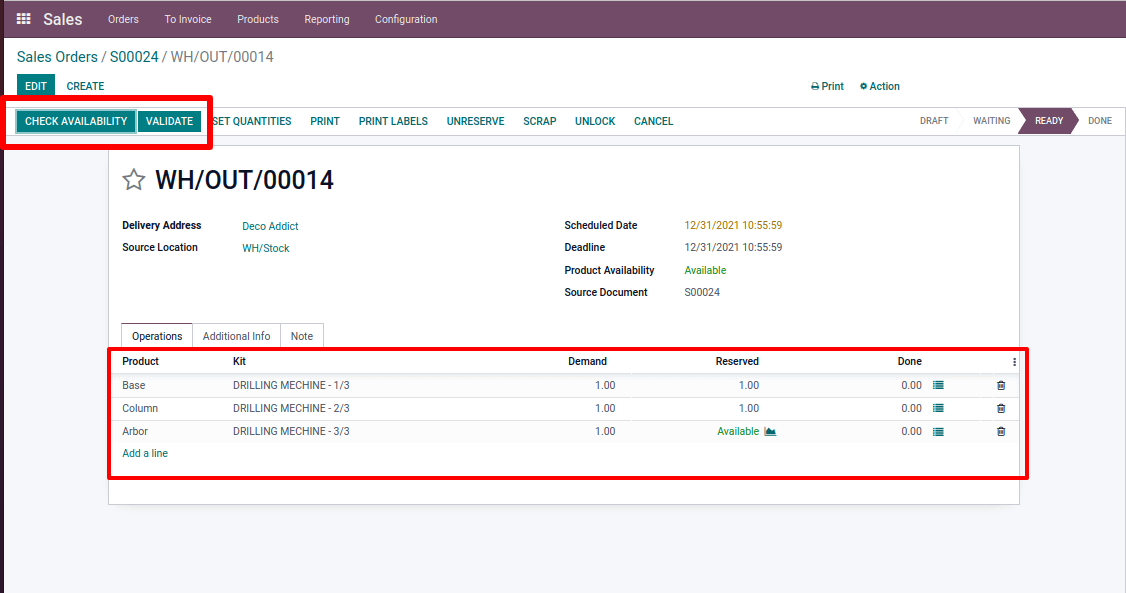
We can see that the product components are automatically added to it. We'll be able to trace and confirm the delivery. Although all of the components and the completed result are considered one product, inventory movements are different.
Start writing here...
Machine Manufacturing Operations with Odoo 15