Odoo 15 Accounting Payment Terms and Follow Ups

Odoo 15 Accounting Payment Terms and Follow Ups

To provide optimal efficiency in invoice and accounting management, the Invoicing module is tightly connected with the Accounting module. The accounting module can simply manage and oversee all aspects of the invoicing procedures, allowing you to efficiently handle complex accounting data. Go to the Customer tab on the module's Dashboard and select Invoicing from the drop-down options as shown below to access invoicing options from the Accounting module. 
If you select the Invoice option, Odoo will take you to a page that lists all of the invoices you've produced thus far, as seen below. 
From here, you may access the previously produced invoice. The Chart will assist you in configuring the Accounting module's Invoicing. Follow the link for further information on how to set up Invoice using Odoo.
Terms of payment

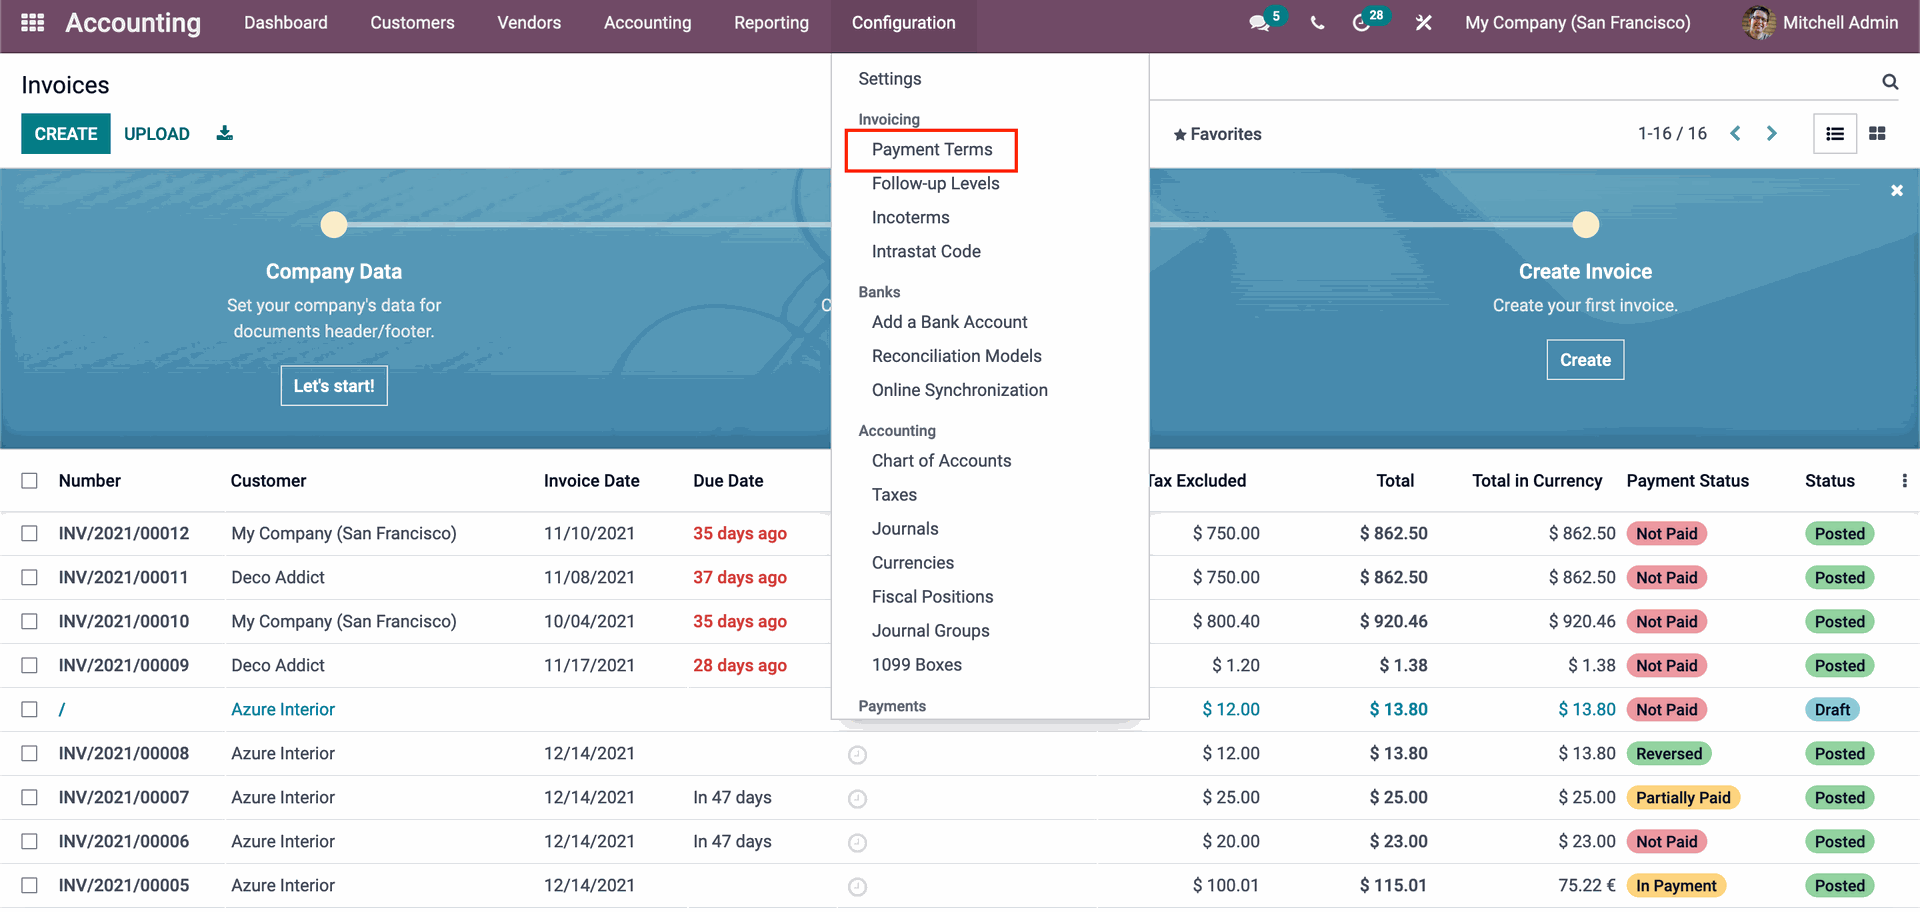
Payment Terms are guidelines that you can include on an invoice that specify how much time the customer has to pay for the product or services you've offered them, or that you can give them through professional invoices. This allows you to get paid faster and will assist your consumers in making all of their transactions as promptly as possible. This functionality is simple to set up in the Accounting module. From the module's dashboard, select the Configuration tab, then Payment Terms from the drop-down under the Invoice section, as shown below. 
This will lead you to the Payment Conditions page, where you may view and use all of your previously generated payment terms, as shown below. 
To configure and set up a new Payment Term, go to this page and click the Create button. 
From here, you can easily create a new Payment Term. Choosing a name for a new Payment term is the first step in the process. Enter the Term and choose the Company from the Payment, Terms column. The Payment Term should be justified by the Term. This makes it simple to manage the Payment Terms. From the Company section, select the company you want to work for.

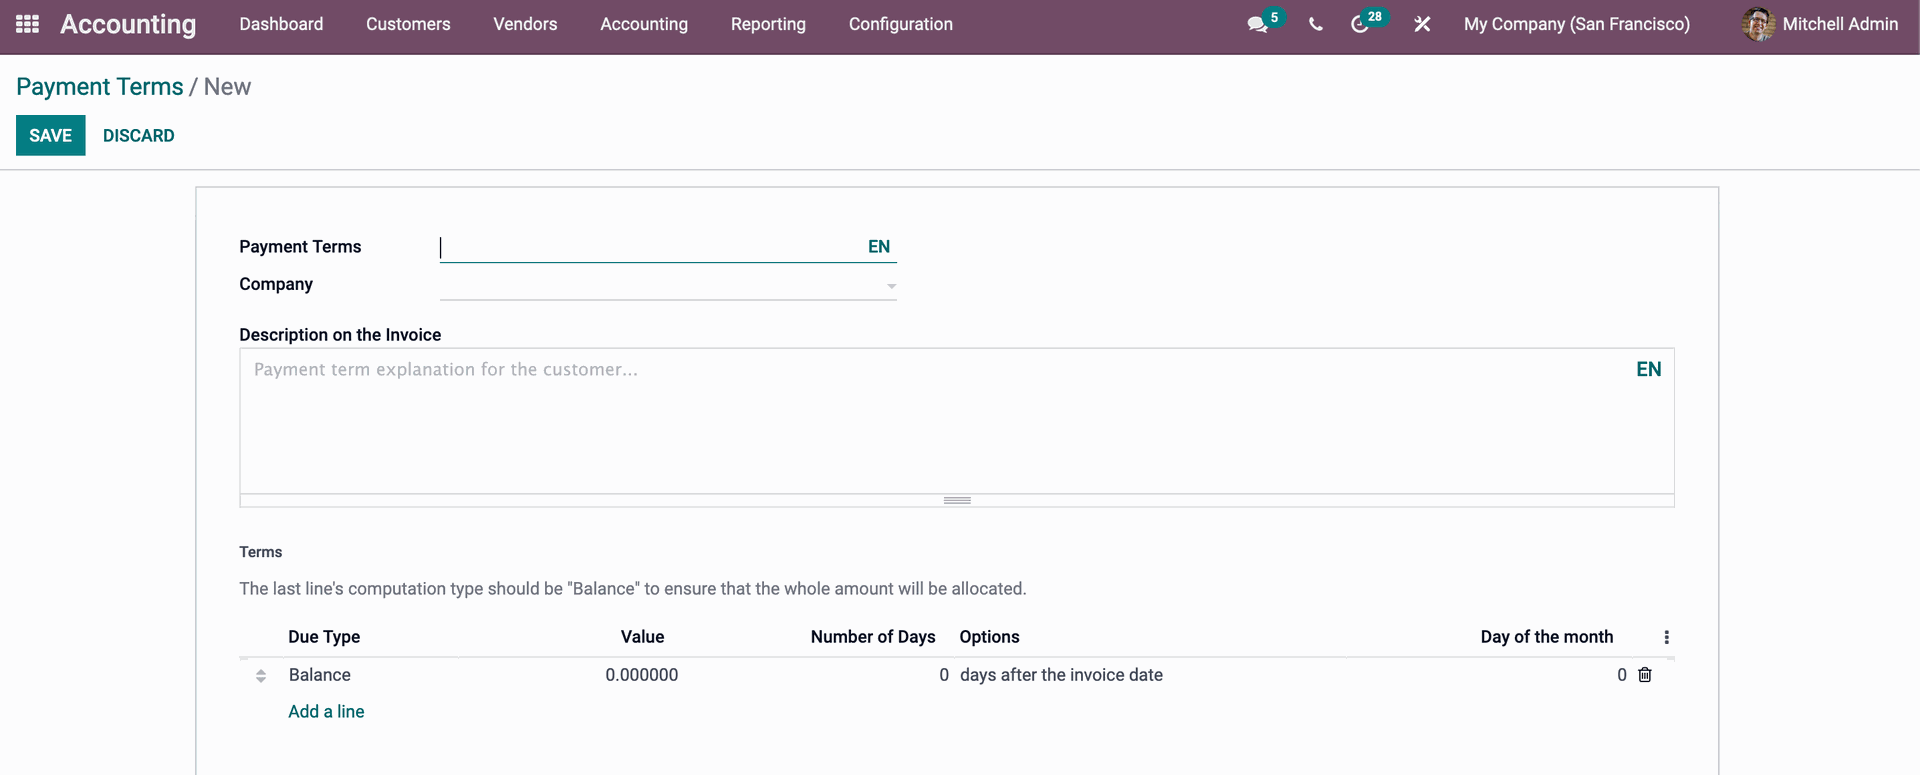
You can rapidly write a description to be printed with the invoice using the Description on the Invoice option. The Payment Term can be explained in the description space. The report should be brief and accurate so that customers can comprehend it at a glance, or you can go into more detail about the Payment Term. After you've given the description, proceed to the Payment Term Tab below for more sophisticated options. The Due date specification on the Payment term is configured in the configuration section, as shown below. 
As shown in the highlighted portion of the image above, click the Add a line button. This will enable you to create a Term. As seen below, a settings tab for configuring the term will appear. 

Here's where you can make a Term form. Setting the term Type is the first step. There are three types to choose from when setting the Type. Fixed Amount, Percentage, and Balance. It's worth noting that the configuration varies depending on the type. Choose a Term type that corresponds to the kind of the invoice you're sending. A new Value line will emerge if you select Percent from the options, as seen below. 
You can enter the percentage value here. You can input the Value in Fixed amount beneath the Value area if you select Fixed amount from the alternatives. As a result, you can enter in the total amount or a percentage of it here.

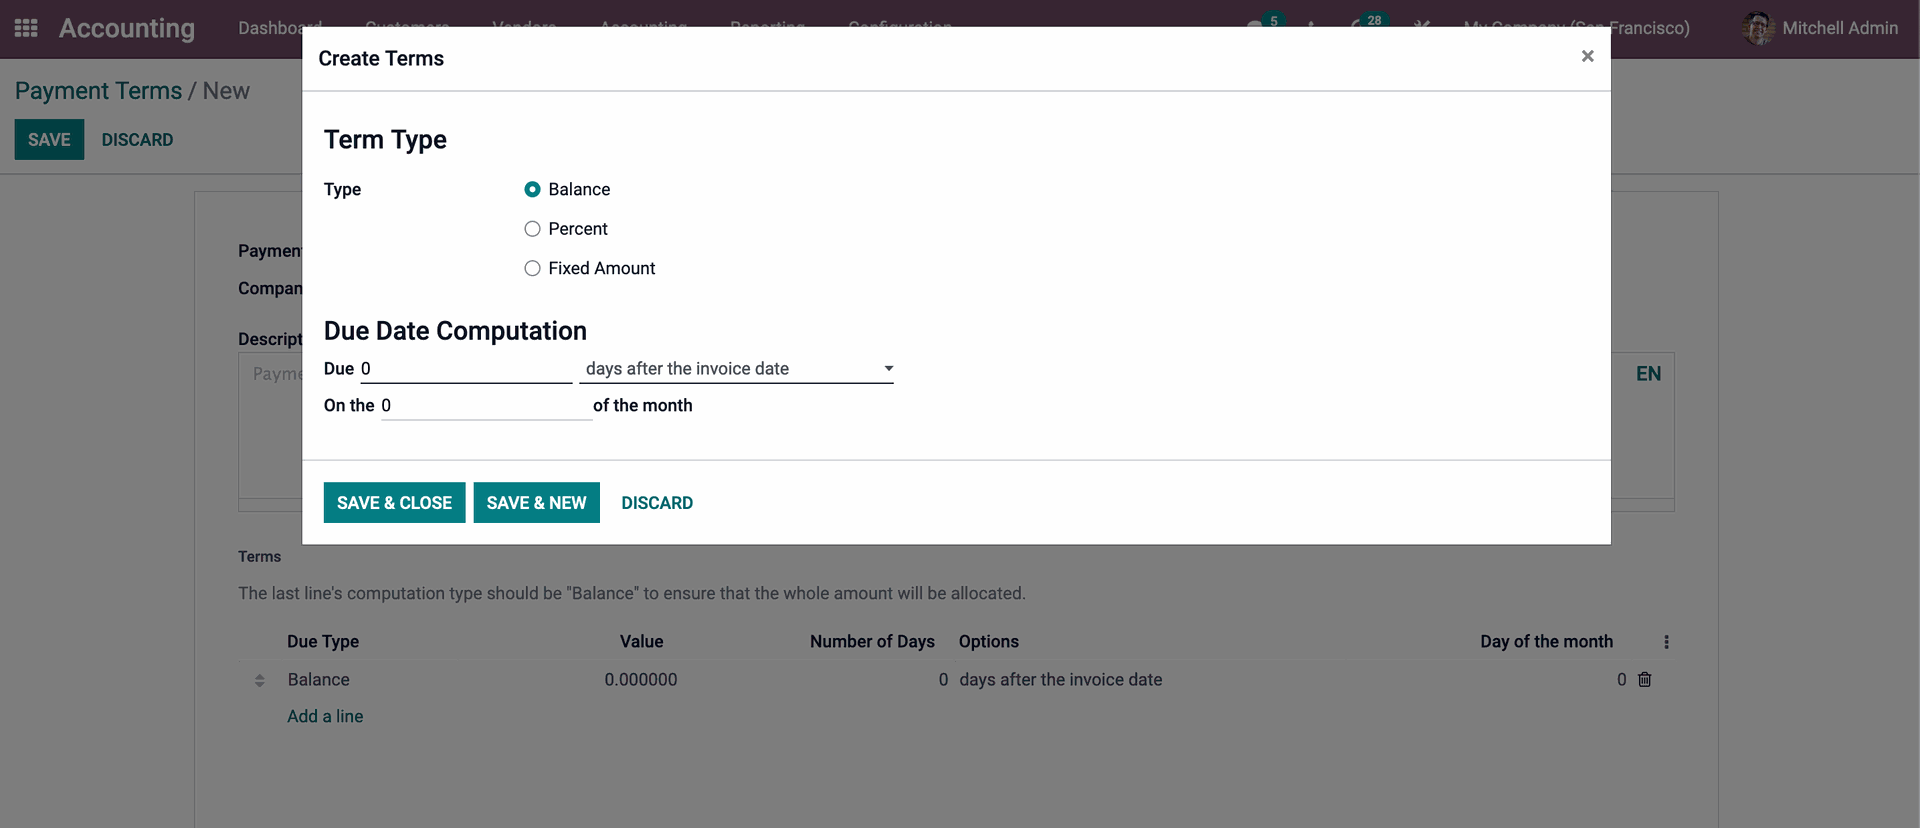
The Due date computation must then be configured. The Due part is the first section under the Due date computation section. Here, you must enter the number of days and the Due Date, and then select the most relevant choice from the Days After the Invoice Date Dropdown menu. Days after the end of the invoice month, the following month, or the current month are all options. After you've finished configuring the Payment Terms, click SAVE & CLOSE to continue.

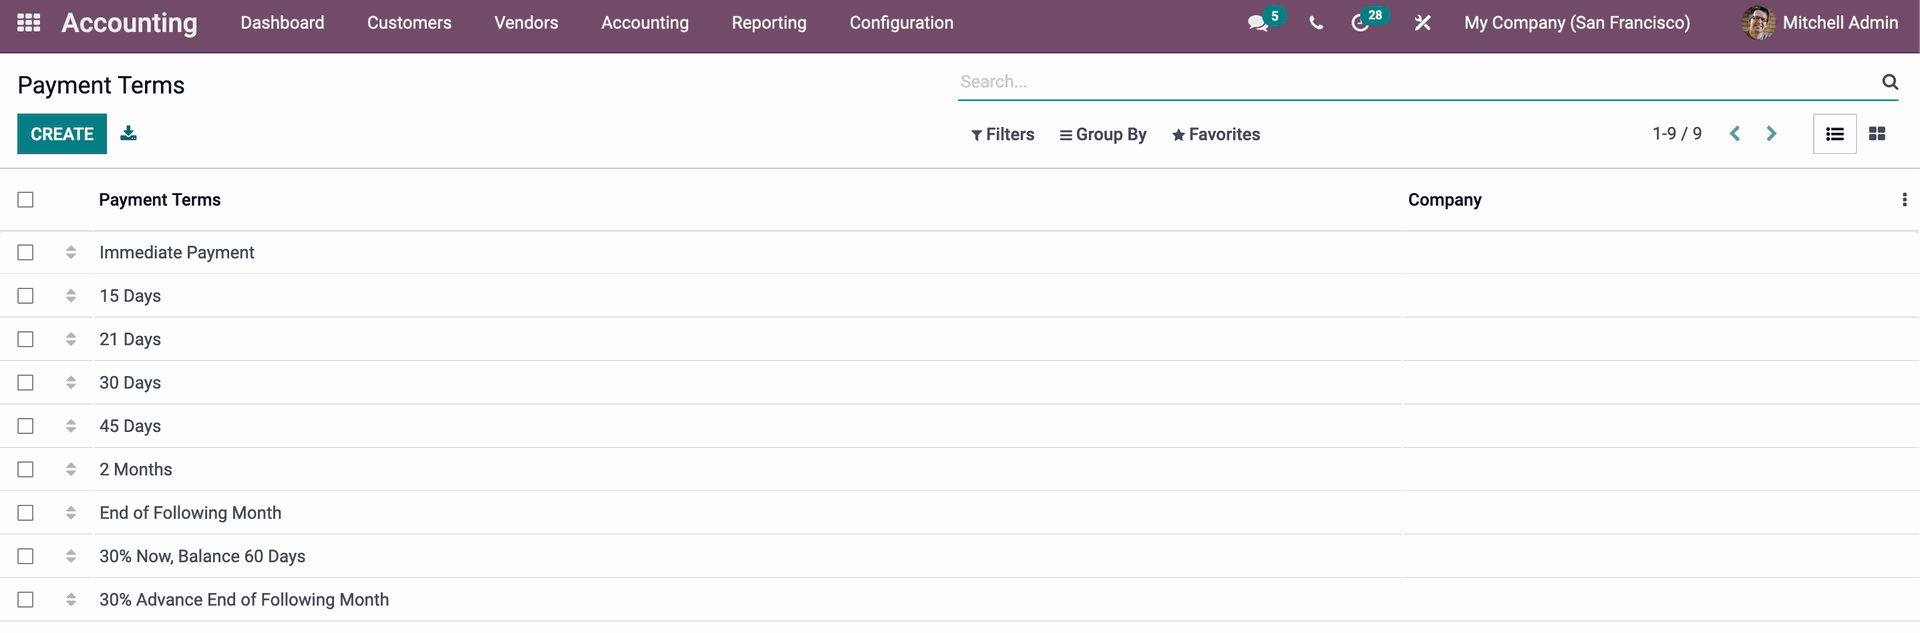
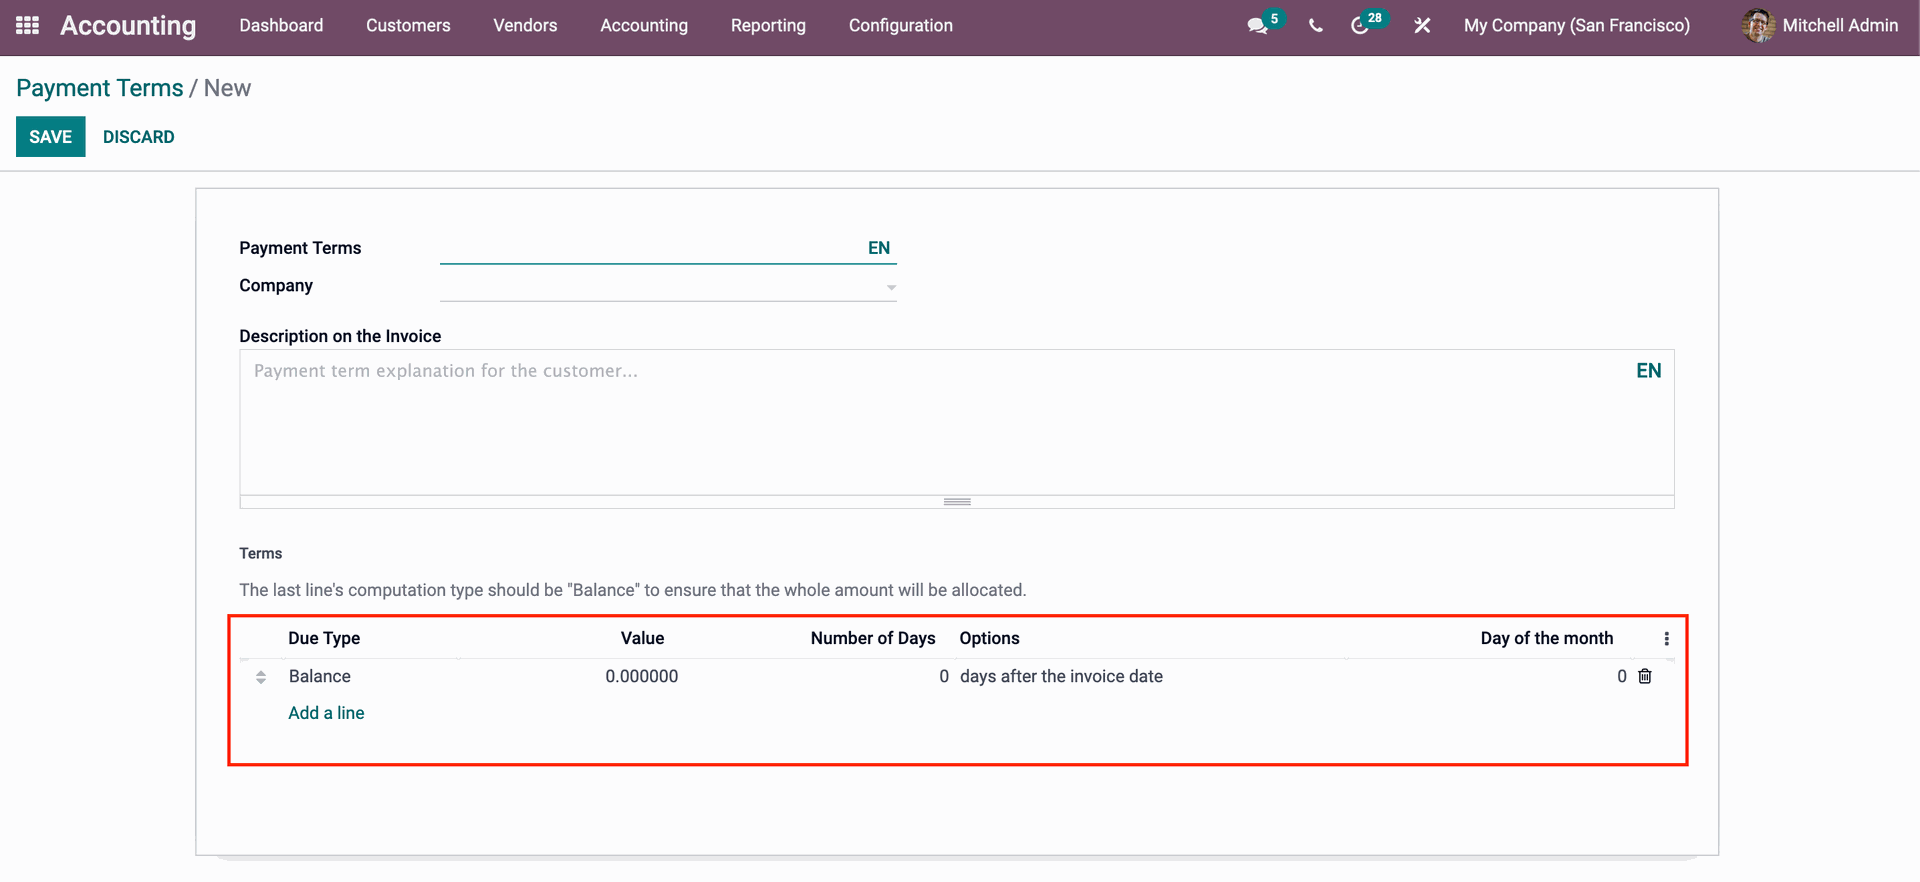
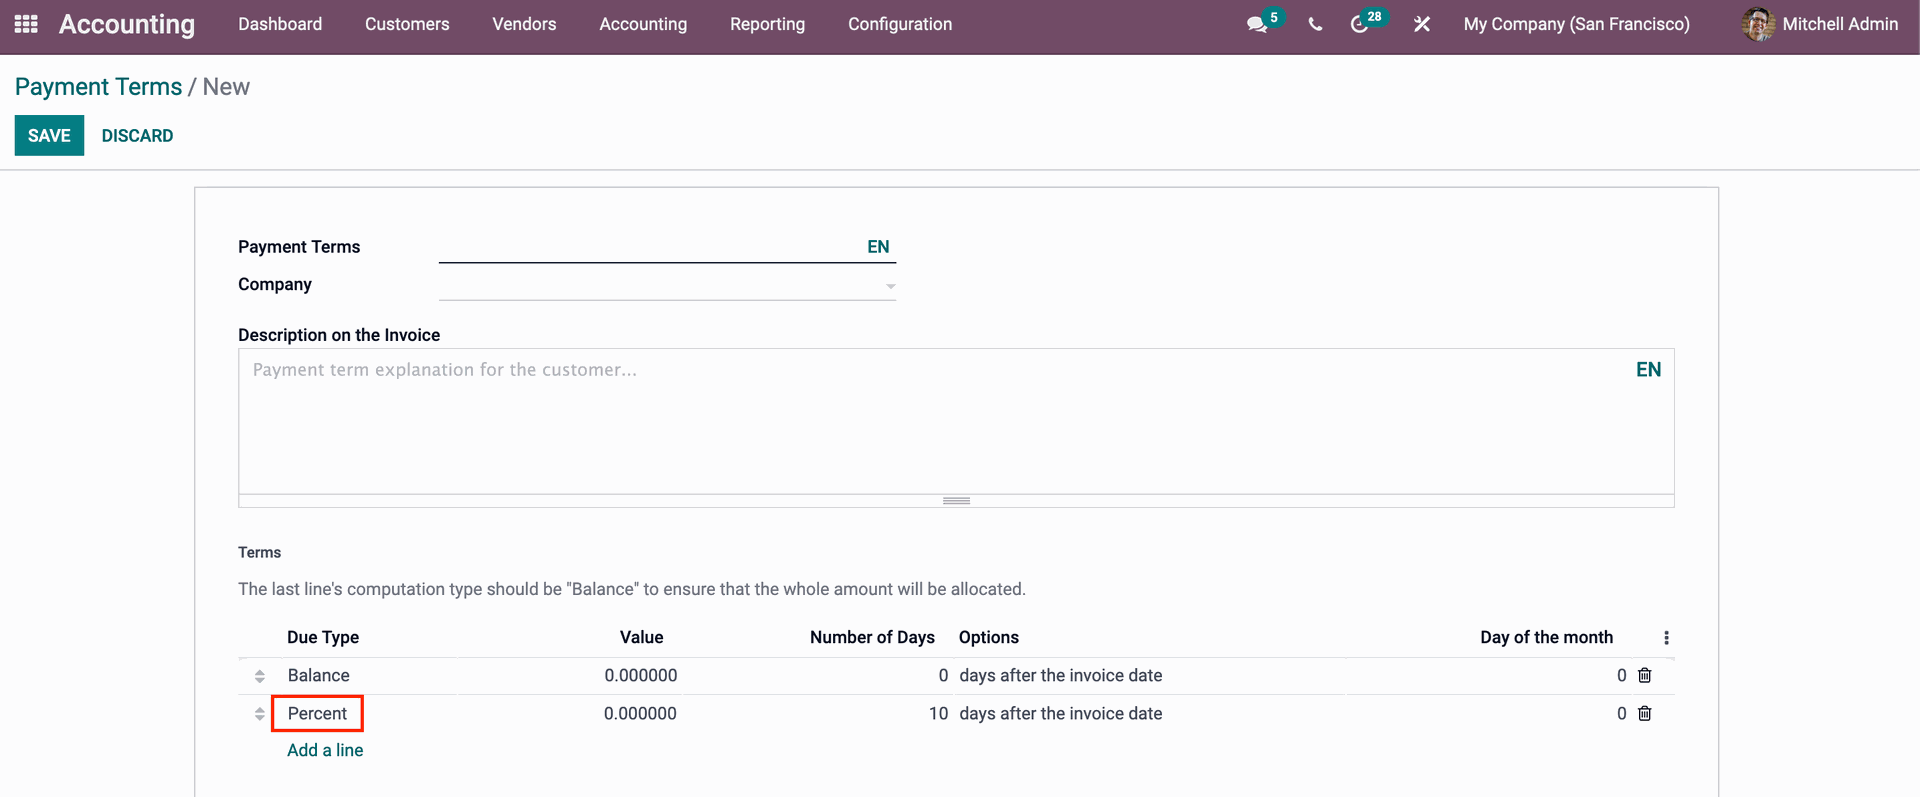
After the configurations on them, you may discover the new line under the Terms section, as shown below. 
It's important to keep the Balance at the bottom of the line or list at all times. The newly formed condition will be instantly placed beneath the balance line, allowing you to move it to the top and guarantee that the entire invoice amount is awarded. You can also alter the Balance by clicking on it, which will take you to the configuration tab, as previously described. After you've completed the configuration, you may begin the invoicing process.

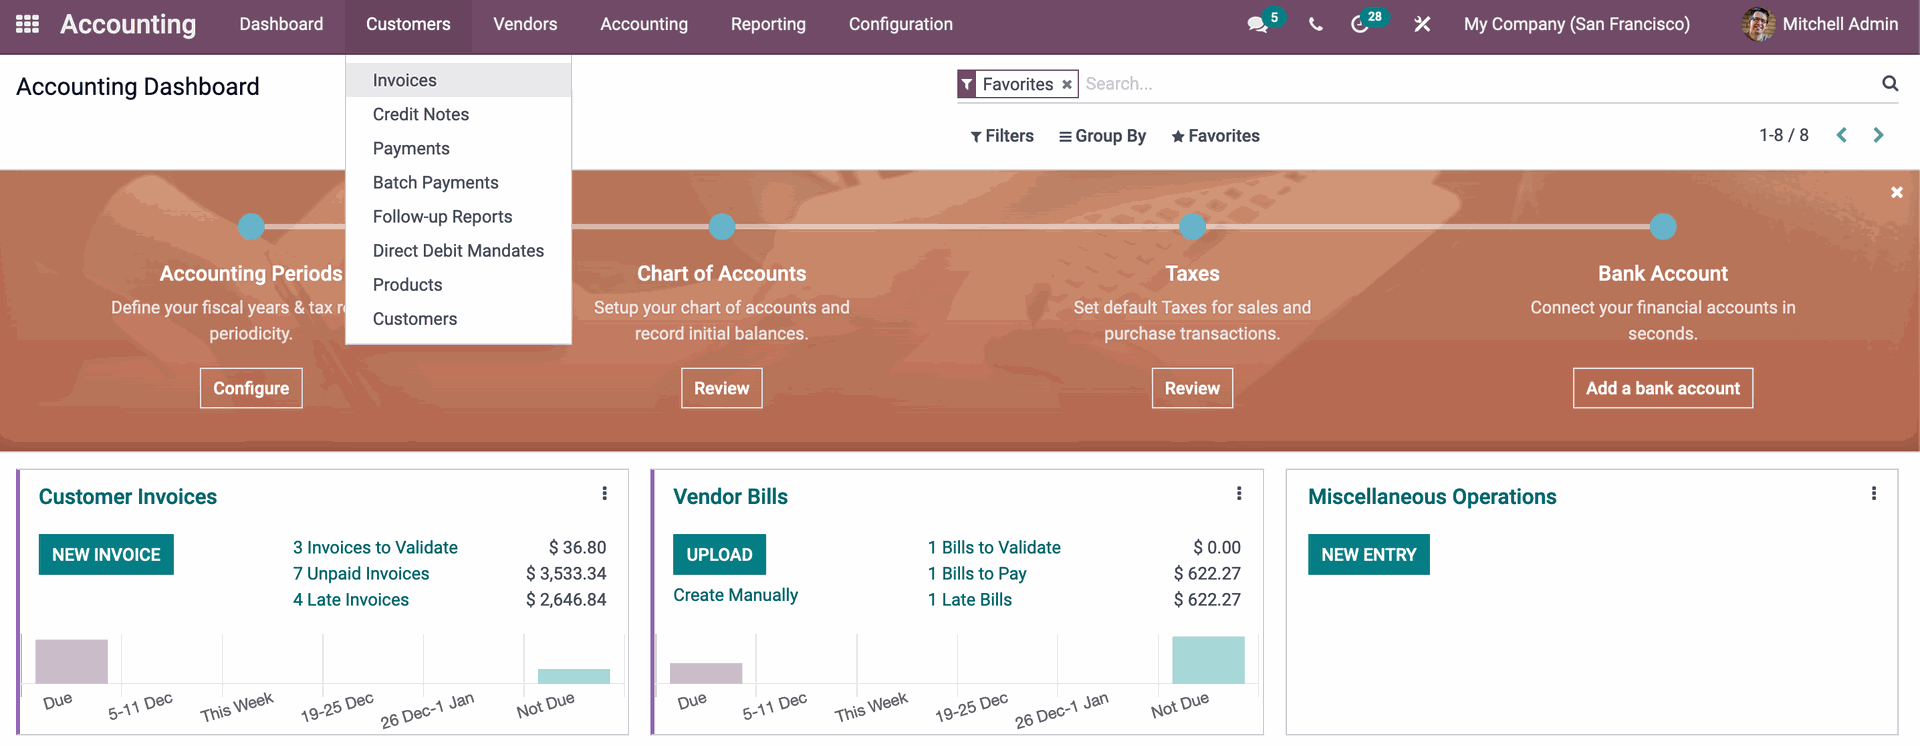
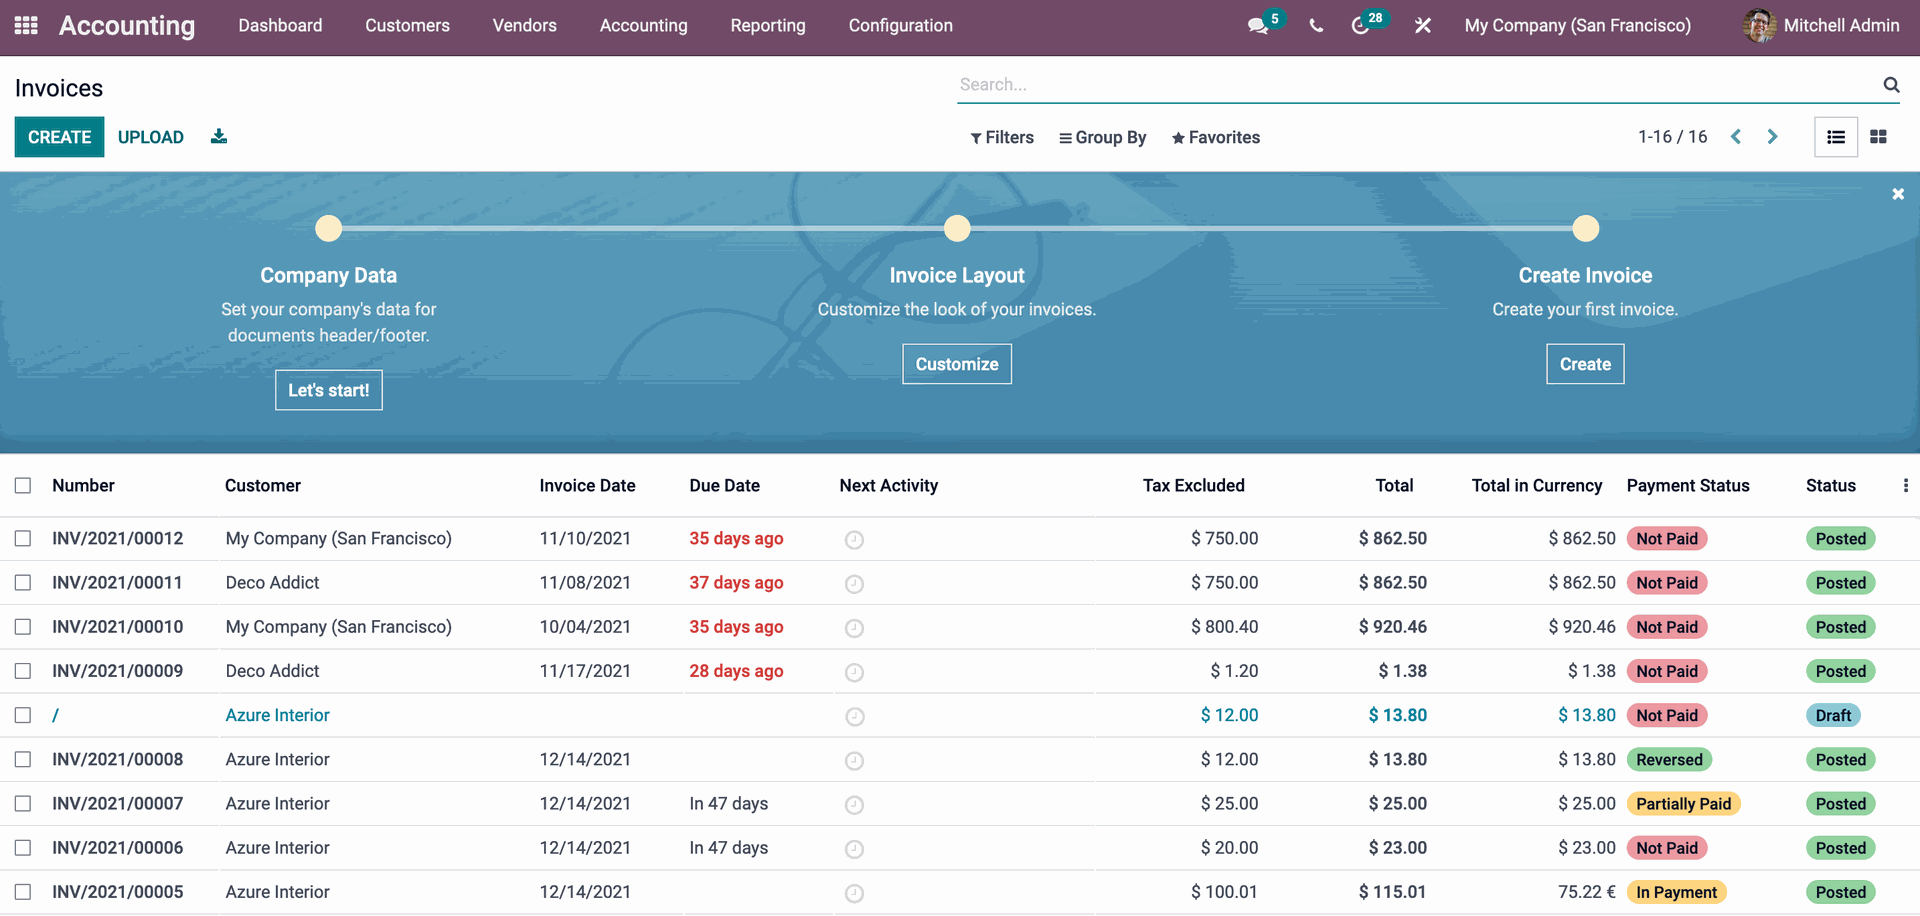
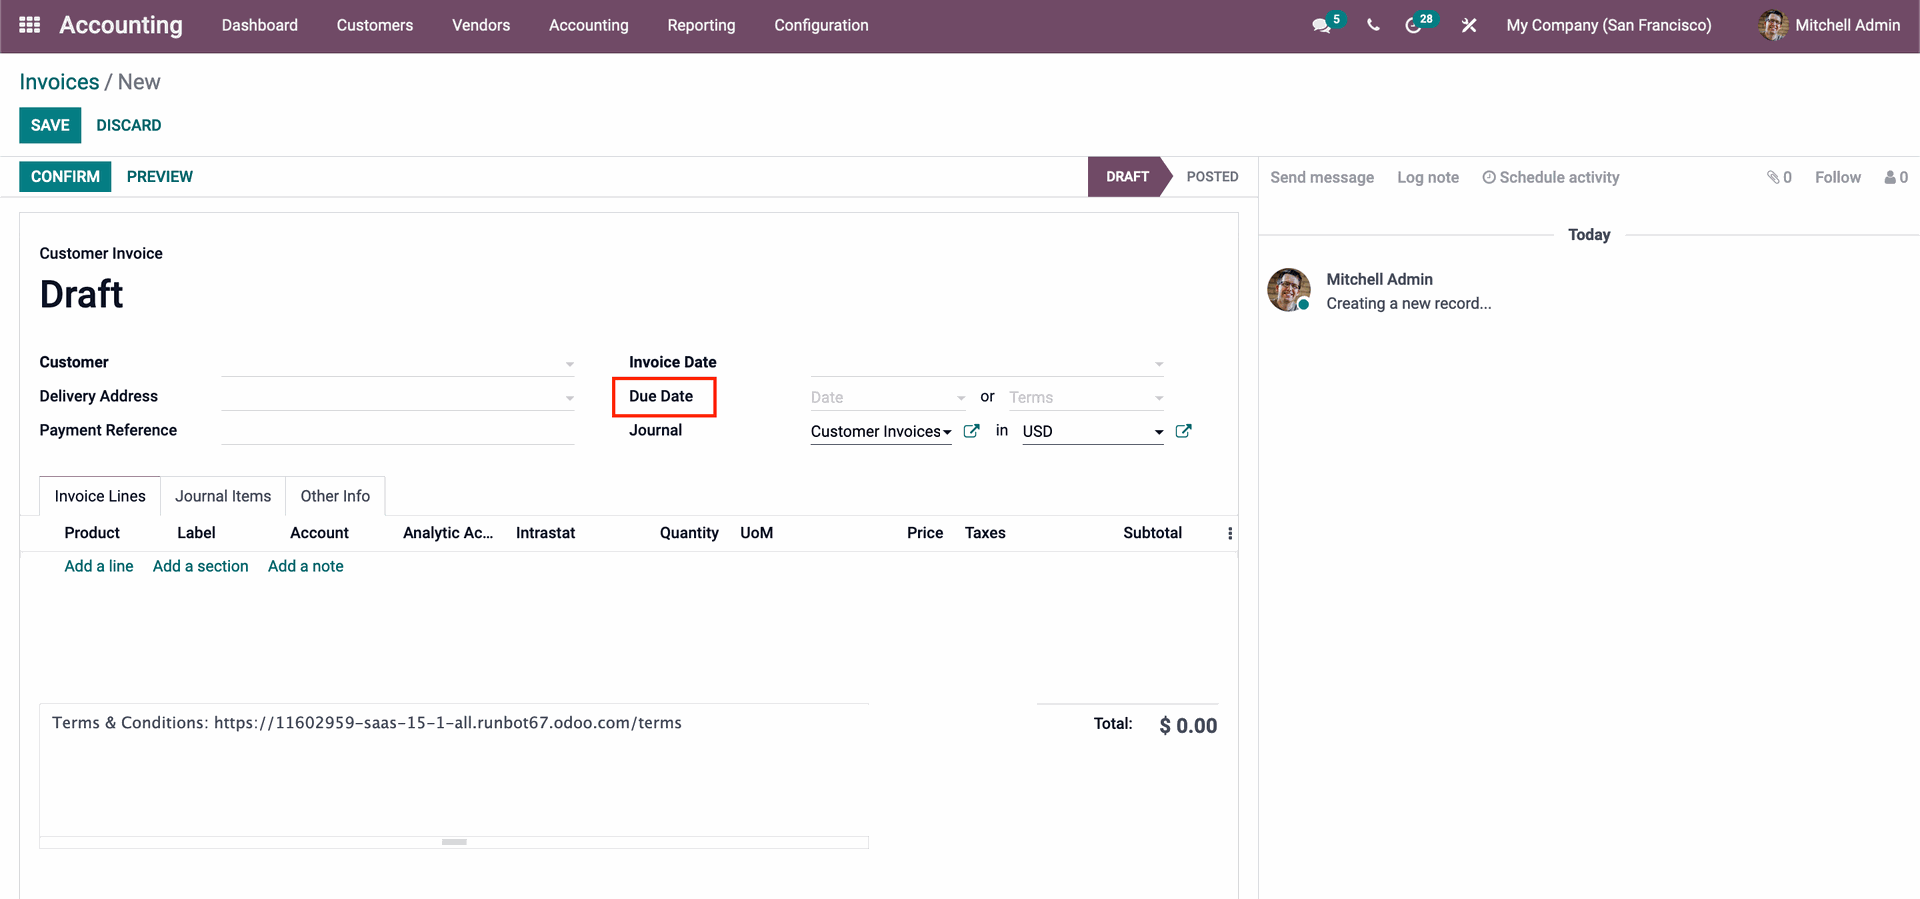
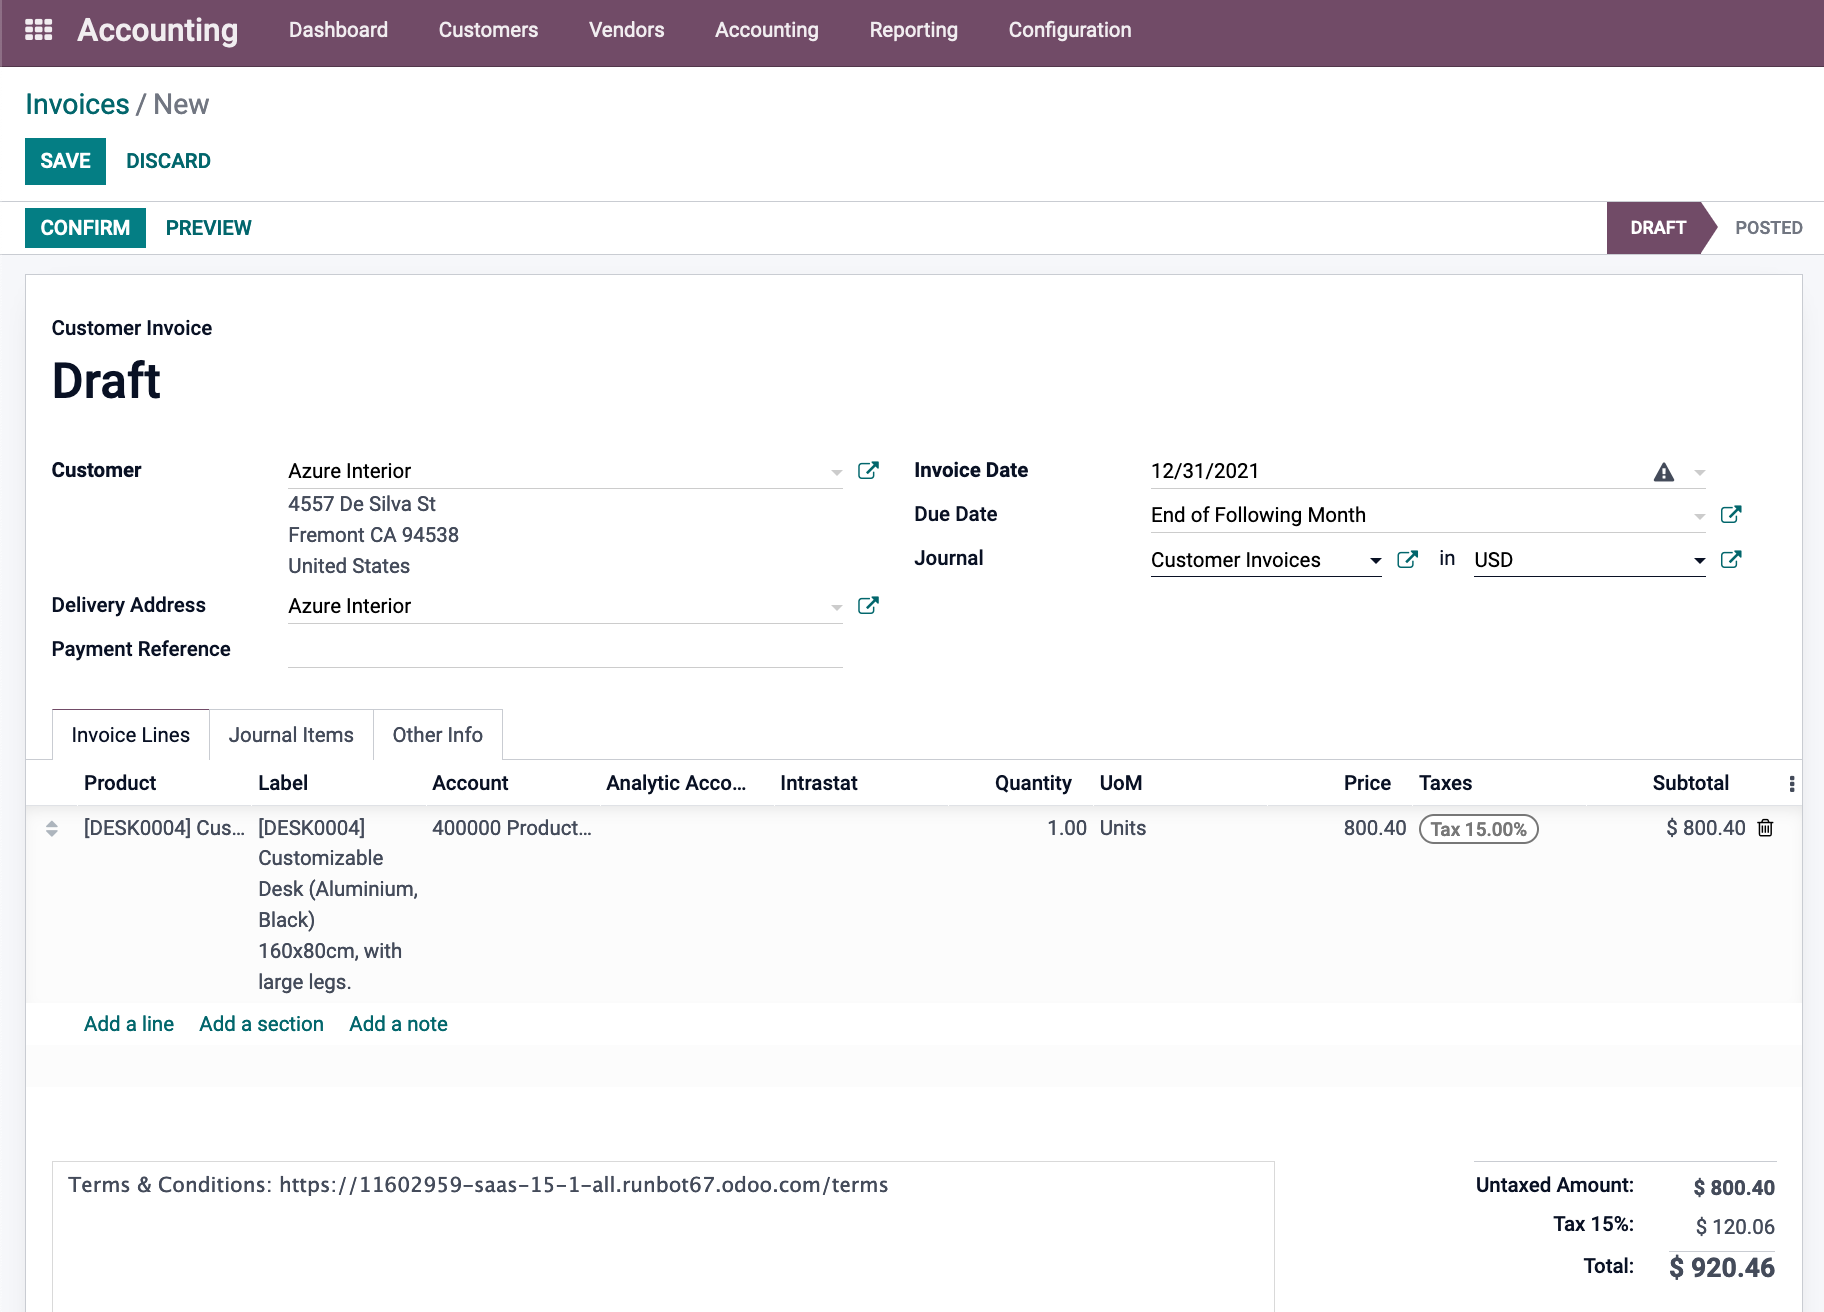
In the accounting module Dashboard's Customer tab, select Invoices from the drop-down menu. The CREATE button will take you to a new page where you may create your invoice, as seen below. 
Fill out the details on the invoice, and then select your payment term from the Due date area, as shown below. 
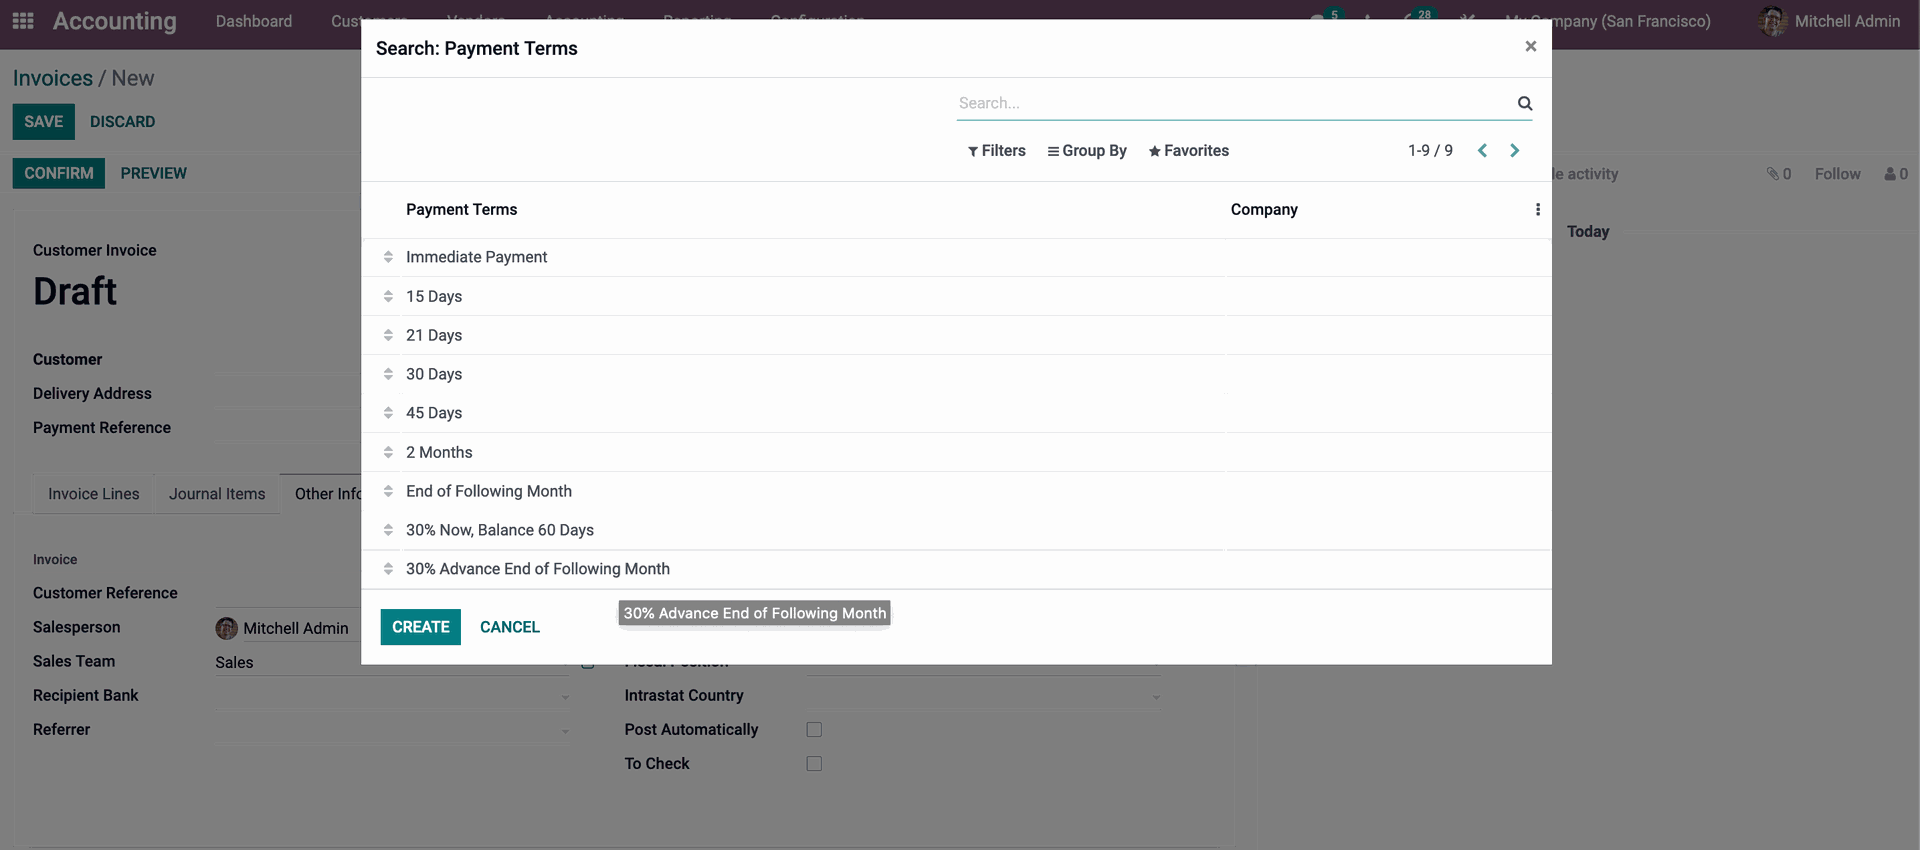
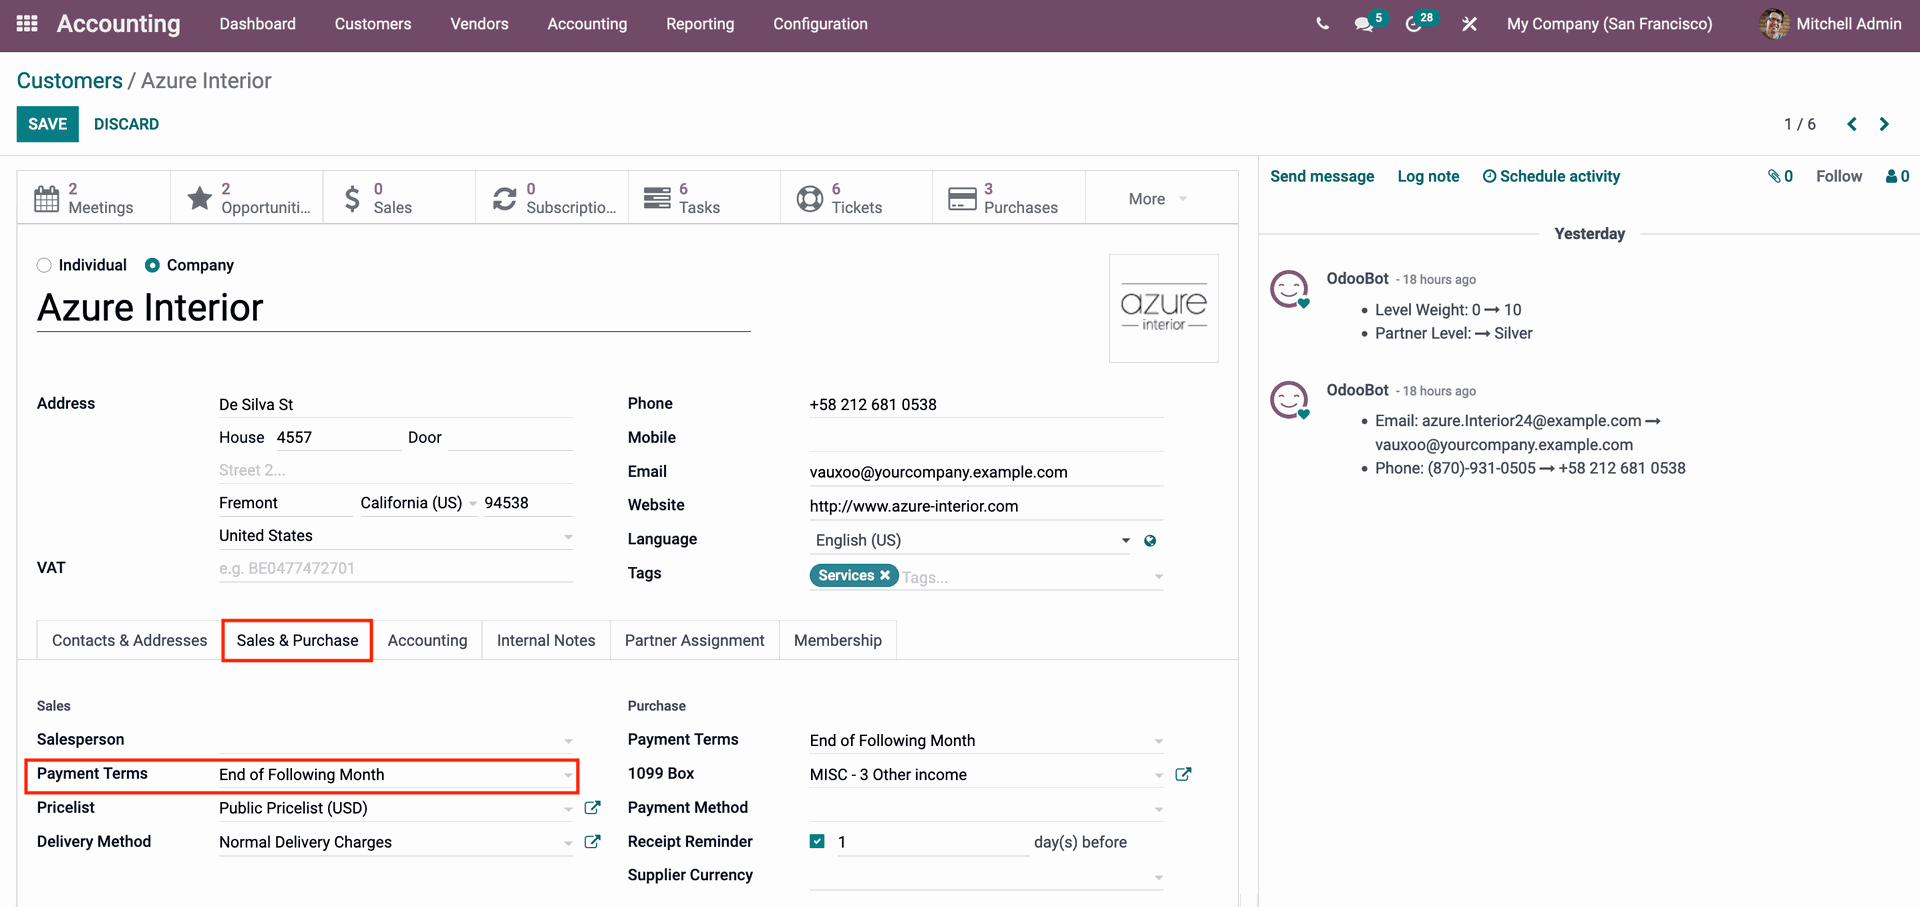
It's worth noting that Odoo allows you to construct Payment Terms directly from Invoices. When you click the CREATE button, Odoo will show you the settings tab, which will make constructing a new Payment Term much easier. Choose the Payment Term as shown in the image above, and it will be automatically appended to the invoice as seen below. 
As demonstrated in the invoice preview below, this will be displayed on the invoice so that the customer can act on the payment properly. 
The applicable Payment Term is noted in the highlighted section above. This allows your consumers to quickly review the Terms of Service and serves as a reminder of the key Payments. Individual customers can have their own payment conditions with Odoo. You can accomplish this by heading to the Customers settings on the Accounting dashboard's Customers tab. As stated below, this will display to your consumers. 
Select the customer to whom you want to apply the Payment Terms from the Options menu, and the customer's configuration page will appear, as shown below. 
Click the Edit button, and the Payment conditions will appear under the Sales & Purchase area, as seen above. Select the payment period from the drop-down options by clicking on the field. Odoo will take note of this and incorporate the Payment period in future invoices to the customer. 


Odoo 15 Accounting Module Follow Ups

The Follow-up levels option is a Payment follow-up process that you can employ to remind consumers of their obligations to pay. Follow Payment follow-ups will ensure that you get paid on schedule and will allow you to communicate with your consumers immediately. Setting the level for follow-ups is critical because it has a significant impact on your company's cash flow. Odoo may send reminders to clients automatically according on their w-up levels. The Configuration tab has a section for follow-up levels, as seen below. 

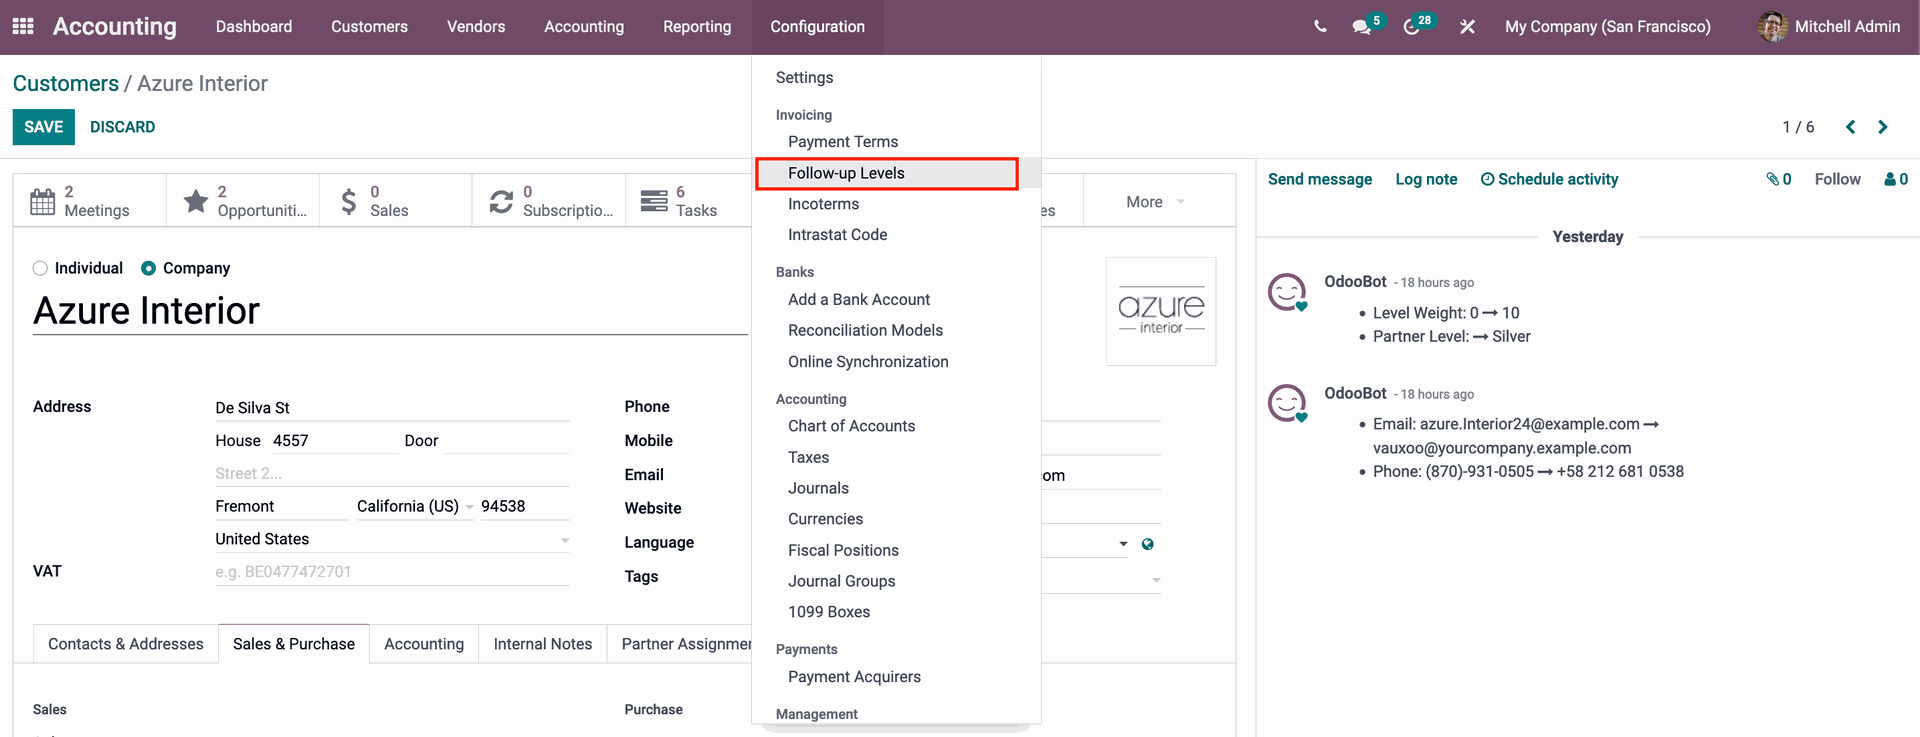
As seen below, you may view or create Payment follow-ups by clicking on it. 
As mentioned above, Odoo has a set of previously installed or custom Follow up. If you wish to change the settings for an existing payment, go to the Follow-up level list and select it. To easily activate follow-up stages, simply check the checkboxes. Click the CREATE button if you want to make a new Follow Up. You can create a new Follow-up from the setup page.
Here is where you may make the Payment Follow-up form. First, give the Follow-Up Action a name. To allow clients to catch up fast, make sure your Follow-Up Action title is precise and to the point. Add the days together. It's long past time for the action to take effect automatically. You can type in the message you want to deliver to clients seeking crucial payments at every level. As illustrated below, you can compose the letter in the message area of the Follow-up level setups. The follow-up action will be sent automatically via email, SMS, and a variety of other methods. These options can be found in the Actions portion of the figure above. After you've finished configuring the feature, click the Save button to save the Payment Follow-up for Odoo to work with. 
Due to Odoo's high level of automation, the feature will be active and deployed to invoices without the need for any extra adjustments. On predetermined dates and times, these follow-ups will be delivered automatically. In the advanced feature's module.

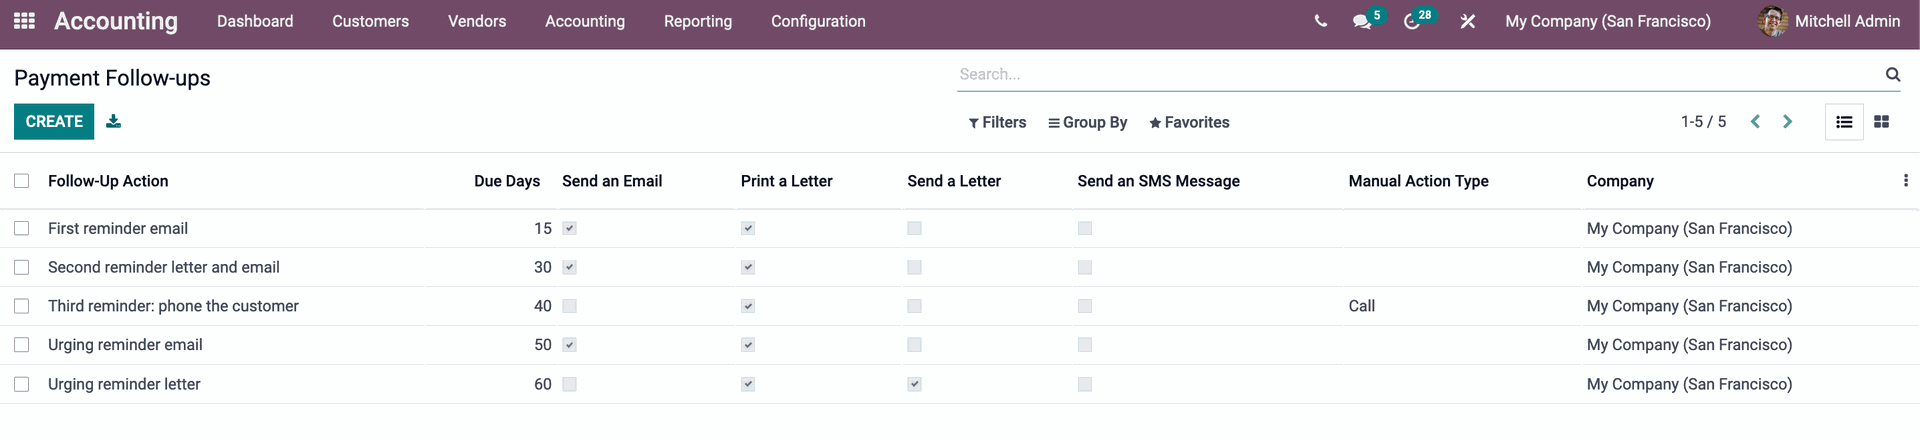
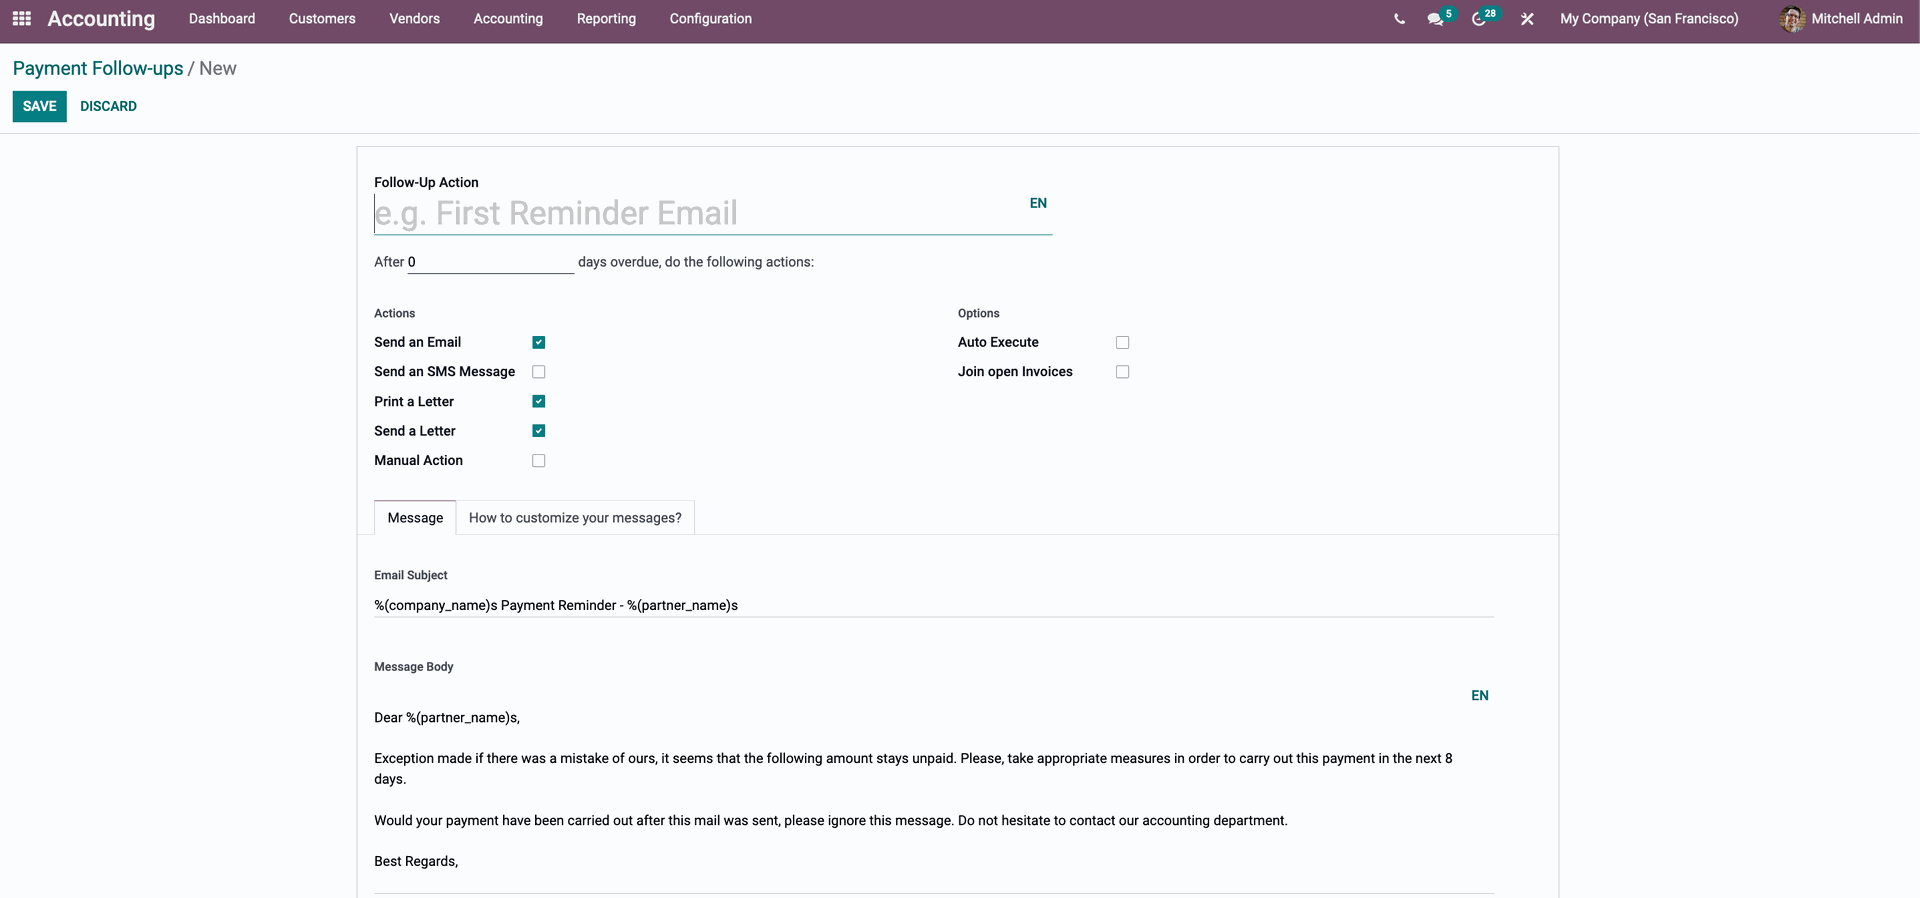
Odoo will automatically recognize the invoices and payment dates because the process is automated, and it will send the notifications at the intervals you specified in the Follow-up level section. Let's start by creating an invoice and following the steps. 

Making Use of Follow-Ups

The first step is to use the Odoo Accounting module to create an invoice and then send an invoice confirmation, as illustrated below. 
Note that the invoice date and Due date are both set to Due in the above invoice setting to make the Follow-ups easier to understand. To finalize the invoice, click the Confirm button. Odoo will assess the due date automatically and set the Follow-up action right away.

Go to the Follow-Up Reports choices under the Customer tab from the Accounting module's Dashboard to get real-time information on Follow-Ups, as illustrated below. 
Odoo will lead you to the Follow-Up Reports page if you click it, as illustrated below. 
Because the payment is past late, it is marked as 'In need of action' in the follow-up area, along with the overdue amount. Click it to see a more detailed view of the Customer and the information that is expected, as shown below. 
You can customize the Follow-up report that must be provided to the customer from here. Click the Pencil button or emoticon as shown below to configure the Follow-up report. 
This will allow you to make changes to the Follow-up request. Send the Follow-up report to the customer when you've configured it. You can send the request via email, letter, post, SMS, or schedule it for a later date. If you haven't configured the medium on the appropriate customer yet, simply click on the medium you wish to deliver with, and the setup tab will appear.

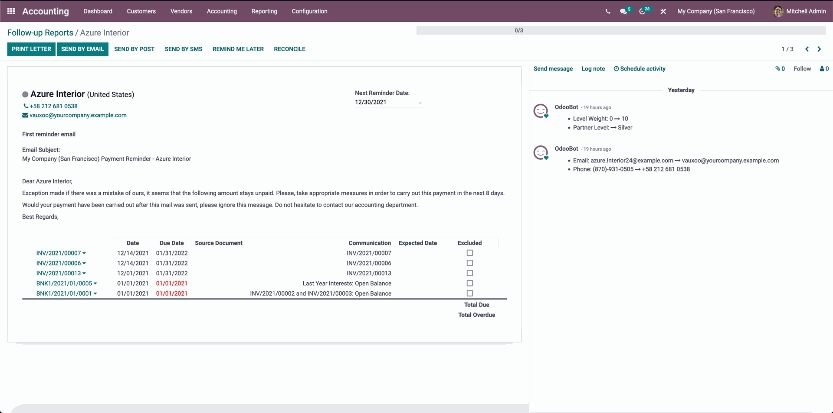
The Print Letter and Send by Email buttons, for example, are highlighted in the above image since both alternatives are available to the consumer. You have the option of sending it via email or by hand. Configurations are required for the other mediums. When you select Send via SMS, a new tab will appear, as seen below. 
You can click the Done button after sending the information, which will show as soon as the mail is sent.
Odoo will also transmit and maintain the Follow-up details automatically based on the Follow-up levels. Each Follow-up email or notification will be delivered to the client for the number of days you specified in the previous Follow-up section. Every time you create a new invoice, the automated procedure will start, and you can quickly change and manage these sophisticated features to maximize productivity.

This will assist you in keeping your clients informed about the payment, which is necessary to maintain cash flow. You can also develop a payment policy among your clients with the help of the Payment terms and follow-up levels tool, which will help you get paid faster in the future. You can ensure optimal clash flow in your business with the help of the feature. 
Odoo 15 Accounting Payment Terms and Follow Ups
Ismail Harake December 31, 2021
Share this post
Our blogs
Sign in to leave a comment
Odoo 15 Accounting Module
  /