Odoo 15 Marketing Automation Module

Odoo 15 Marketing Automation Module

Marketing is a crucial aspect of any organization. Odoo has the most advanced marketing tools available. The Odoo Marketing Automation module is a powerful tool for increasing marketing efficiency. The module is closely tied to Odoo's other marketing modules. To achieve optimum effectiveness in marketing management, all of the marketing modules work together to provide a single working ground. This module is simple to set up or configure in Odoo 15. The module provides you with an improved working environment in which you can quickly manage and work on marketing procedures. To nurture and motivate your leads to become active customers, you'll need marketing automation. You can use the intelligent module to send the appropriate promotional program information to the appropriate partner at the appropriate time. 

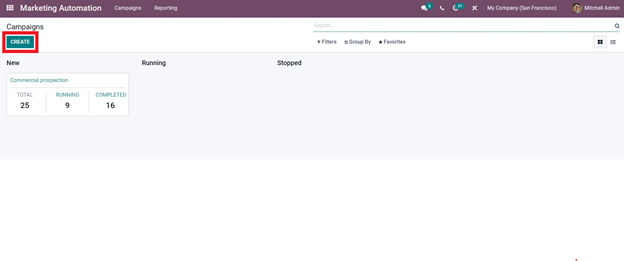
Odoo Marketing Automation Module Configuration

To start a new marketing campaign to nurture your new leads, go to your Marketing Automation module and click the Create button as shown below. To efficiently send campaigns to the proper leads, you must first go to the Odoo CRM application to view the proceedings on the leads and customers, as well as look at the review of your sales staff, before starting a new campaign program. After hitting the create button, you'll be sent to a screen where you may set up the campaign, as seen below.
From here, you may customize the entire campaign. Begin with naming the campaign; make sure it has a catchy name that will entice your leads to learn more about it. The next step is to select a target. To apply a target, select it from the dropdown selections. Select your leads or opportunities from the list below if you wish to target them. 
Because the module is tightly integrated with Odoo's CRM module, the platform will recognize and organize the leads automatically. After configuring the Targets option, the campaign will be sent to the targeted leads. You'll notice that under Target, you have a lot of options for who you want to send the campaign to. Choose how to proceed with the procedure based on the nature of your campaign. Following that, you can create a filter for the Leads you wish to include in the application. As seen below, click the Add filter option and select a filtering option from the drop-down menu. 

Select the desired filtering option by clicking on it. You can use the search bar to look for the filtering option. To continue, look for the filter and apply it, then click Add new activity key as shown below. 
The key provides a new action based on the data collected from the CRM module on the new Leads, according to your marketing strategy. The Add New Activity key will lead you to the activity's settings section, as seen below. 
Enter the name of the activity and choose the activity type. Email, Server action, and SMS are the three sorts of activities. Depending on the sort of activity you select, the template option will change. If you selected Email, the Mail template, Server action, and SMS template options will appear. Let's continue with the Email template as shown below for the sake of explanation. 
 

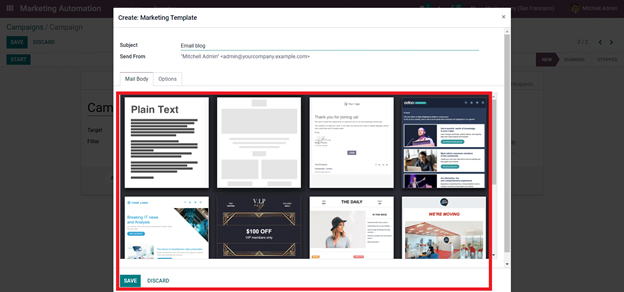
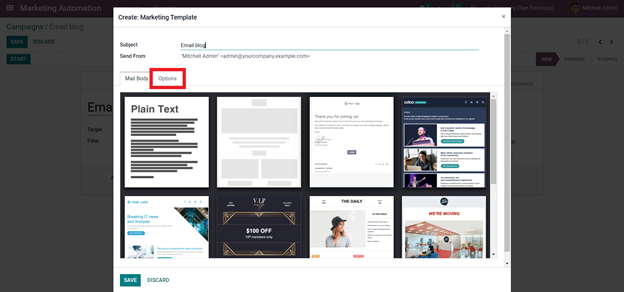
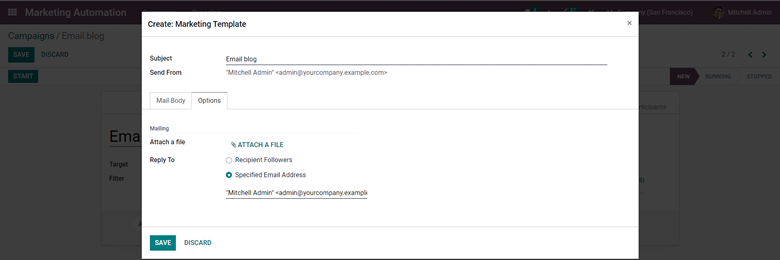
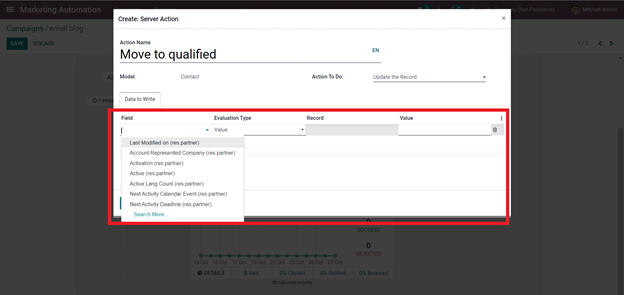
Create Emails with Odoo Marketing Automation Module

Select Mail Template from the drop-down menu, then Create and Edit. 
As illustrated below, a new configuration page for generating a new template has been added. 
The highlighted part in the image above displays the templates that you can use to construct and design your emails. Allow the Subject to choose a body from the available templates. To configure and use the template, click on it as shown below. 
The body of the email can be customized according to the template selected. You'll also note, as seen below, that a new part has appeared on the screen to the right. The advanced configuration choices in this area will help you create the letter body you want. The section is full of Blocks, an Odoo-only feature that you may drag to the mail body to apply to the message. The blocks include functions and features ranging from a logo to marketing information and other complex options that your subscribers can access straight from a single email. 

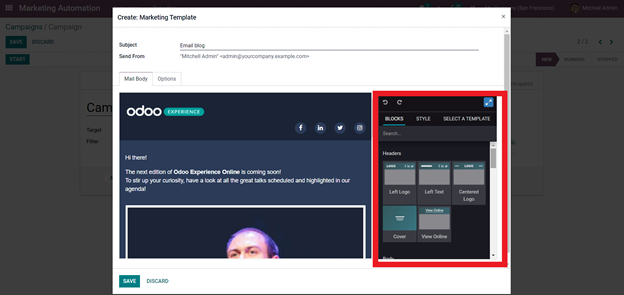
Odoo Marketing Automation Module Blocks

Structure: The structure blocks focus on giving the website's basic structure. You can think of them as fundamental building blocks with functions for adding the most important data. The sections are as follows:

1. Banner: You can use the banner block to add a banner to your website. On a website, a banner is a type of advertisement. This section can be used to provide further information about the featured content.

2. Cover: Include catchy headlines and subtitles that relate to the headline in the cover block. Use this block to draw the attention of your customers.

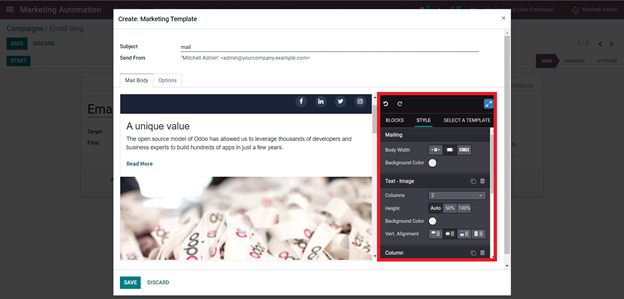
3. Text-Image and Image-Text: You can use this block to insert an image and text. This block can be used to write about products and services and to include an image that corresponds to the textual information.

4. Heading: The heading block essentially allows you to give your site tilt. 

5. Text: You can add text content to this block. Under this section, you can write about products or anything else.

6. Numbers: The numbers clock can be used to display merchandise on numbers or contents beneath numbers.

7. Picture: The photo block allows you to add a picture to the page, as well as subtitles and catchy headers.

8. Columns: You can add three features to the columns block. These blocks can be used to add three key aspects to your products or services.

9 Big Boxes: In two major-sized columns, you can use these blocks to showcase essential content or products. 
Features: The 'Features' block set allows you to add more features to your website so that your visitors can have a better look at the products or material on your website. This section's blocks are mentioned below. 
1. Comparisons: The comparisons block allows you to add similar products, services, or plans for visitors to compare and pick from.

2. Team: Use this block to give a shout-out to your teammates. You can include anyone who is in charge of new items or the company.

3. References: This Block allows you to add references to your document.

4. Call to action: The call action Block comes with a Call now button which the visitors can use to contact your business.

5. Accordion: This block can be used to include the Terms of Service, as well as links to other websites and Cookie information.

6. Feature grid: You may use this feature to create a list of features. You will be provided two parts in which you may create Slogans and edit the icons to list the features. 
7. Table of Contents: As the name implies, you can include a table of continents for your products or services, as well as the features that support them.

8. Pricelist: You can add products and their price lists to this block. 

9. Objects: Use this block to show off your products and items, as well as their features and functions.

10. Tabs: Use this space to include one or two sentences describing your product and services, as well as your contact details.

11. Quotes: You can add quotes to this block. You might include the CEO's quotes or quotes that represent the basic ideas that your organization is built on or believes in. 
Dynamic content: This group of blocks will allow you to add dynamic material to your website.

1. Form: The form block enables you to collect vital information about your visitors, such as their contact information, which they may enter straight into the forms.

2. Map: This block will show your company's locations.

3. Products: This block enables you to present products in a sliding manner for visitors to browse and select from.

4. Search: Using this Block, you may add a search bar to your website, allowing visitors to look for products or services.

5. Blog articles: Using this Block, you can upload blog entries straight to your website for people to read and choose from.

6. Events: The events box allows you to provide details about future important events. 
7. Newsletter block: The newsletter block can be used to collect visitors' email addresses in order to inform them of new product announcements and other marketing information.

8. Newsletter popup: This block will appear as a popup, collecting user emails so order to send them information about new vents.

9. Popup: This block will appear at random and display essential information about offers or other data.

10. Facebook: This block allows you to show your Facebook link, which viewers can click to visit your Facebook page immediately.

11. Countdown: You can use this block to create a countdown clock on your website for a new event, product launch, or anything else.

12. Discussion group: You can use this to add a discussion area to your website. 

13. Twitter scroller: This feature allows you to add a live Twitter feed to your website for users to see.

14. Contribution: You may set a donation key for your visitors to donate to your new projects or charity using the donation button. 
Drag any of the blocks from the Blocks section into the mail body to apply them to your message. Then, as seen below, you'll be given advanced style capabilities to adjust the contents in the blocks according to the nature of the email you're sending. 
The style feature can be used to customize the selected block. You may use a variety of choices and settings under the feature by just clicking on them. Note that you may use the style section's settings to alter the blocks as much as you like with respect to your company or product theme, which will assist your leads to form an immediate connection with the company. The next step is to choose a template that allows you to add elements from another template to your chosen template. This step is optional, but it can be done if your email requires it. Following the creation of the Mail body, you can use the Options tab to access more Email options, as seen in the figure below.
The settings tab will direct you to a configuration section where you can further customize your emails, as illustrated below. 
Attach a file to your email and Reply to choices that are available in these sections. The reply mail address can be set to Recipient followers or Specified email. You can use the Email address as the Reply-to address for the Specified Email. After you've finished configuring the email, click the save button to save it. 

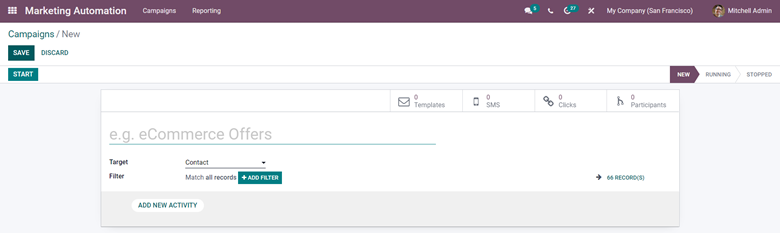
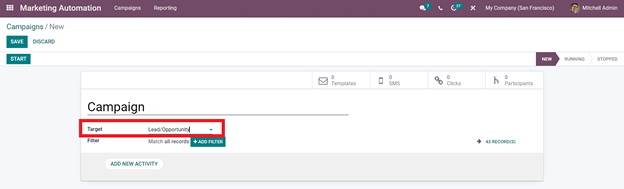
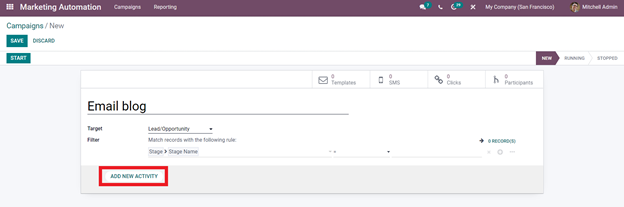
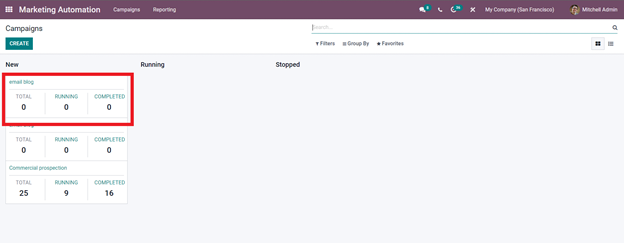
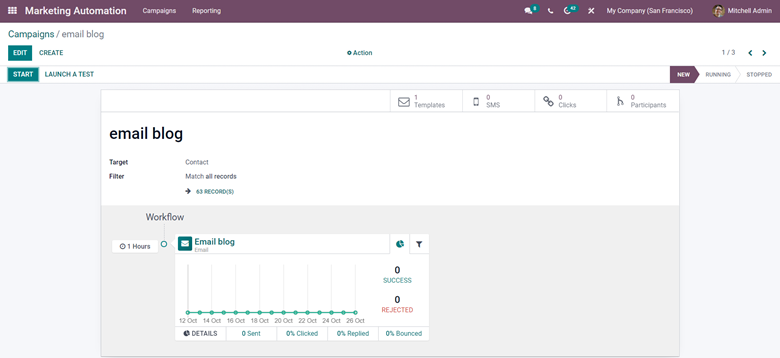
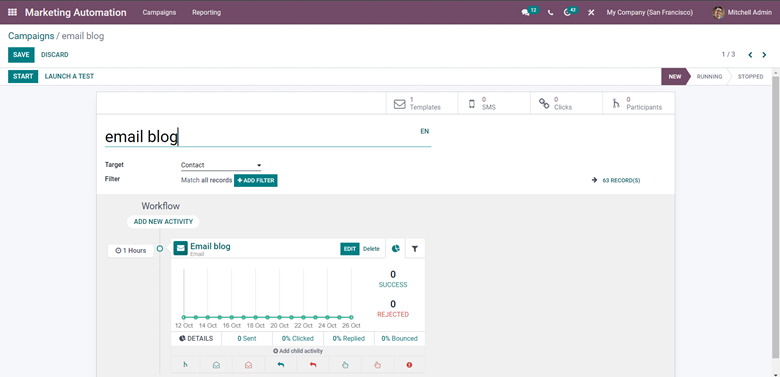
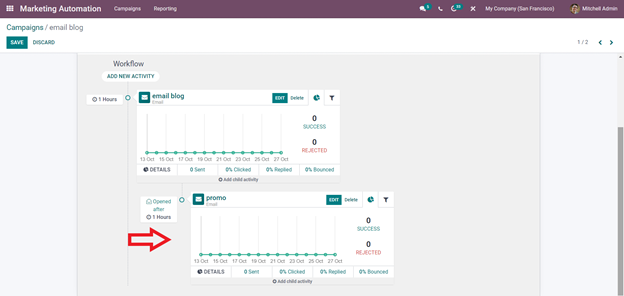
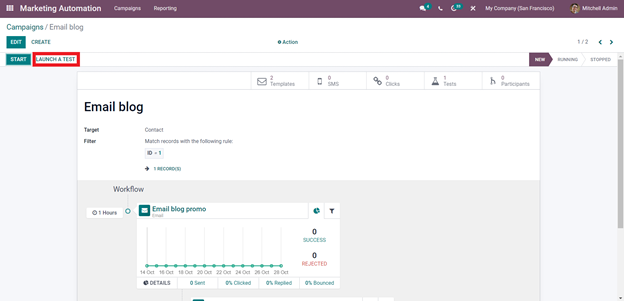
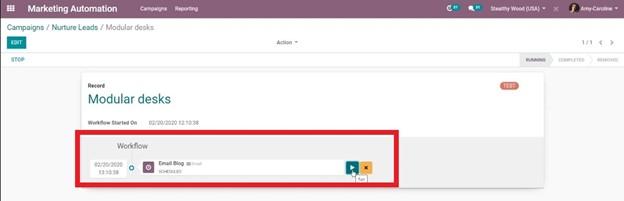
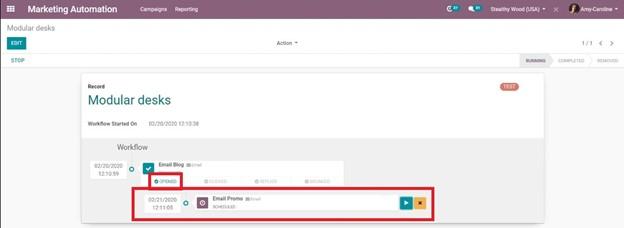
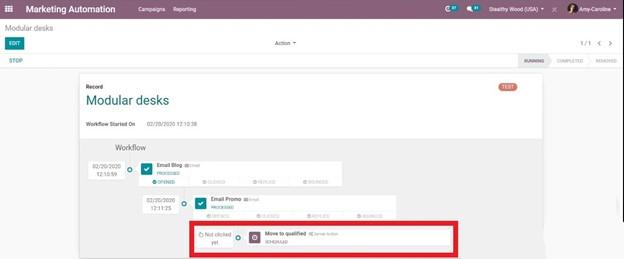
Create and send campaigns with Odoo 15 Marketing automation Module

 
After you've finished configuring the letter templates, you may go on to the Campaign. It's worth noting that the newly produced email template will be available for use in the campaign section's Email templates section. After that, you may set up the Trigger option. In the image above, the trigger choice is highlighted below. You can use the trigger option to establish a trigger for your freshly created email campaign. You can set a variety of parameters under the Trigger option. You may also choose when the trigger should be triggered, and there are other alternatives to choose from, as seen in the image above. You can also set the trigger's activation time. If a lead clicks on a promotional email you've sent them, you may arrange the automated mailing system to send them another email an hour later, or a day later, and so on.
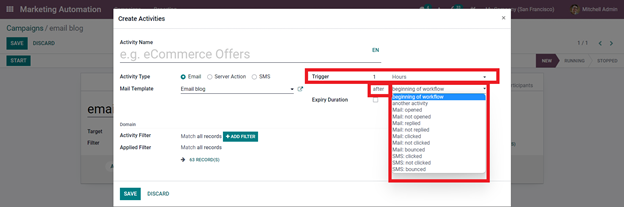
It is recommended that you treat leads with care and do not bombard them with emails that will have a negative influence on their perception of your company or items. 
After you've set the trigger, you'll need to activate it to set the Expiry Duration.
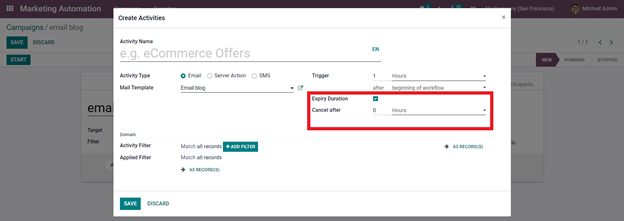
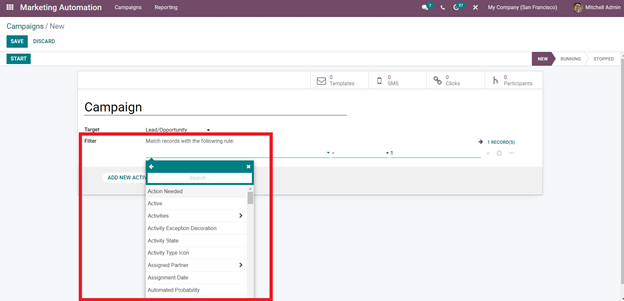
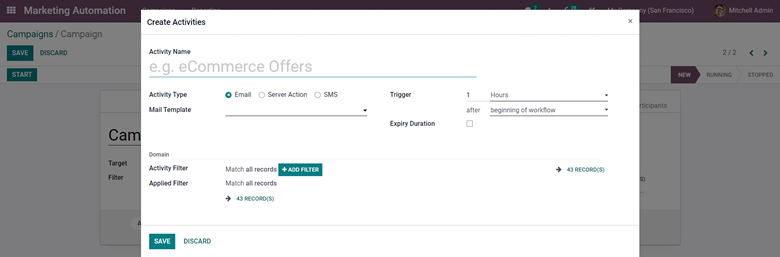
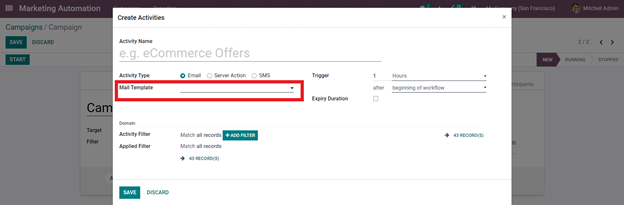
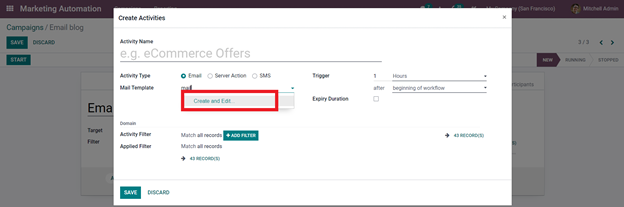
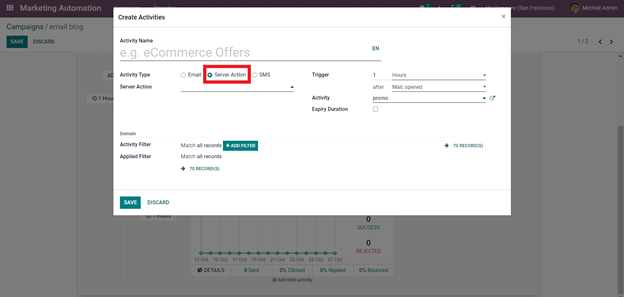
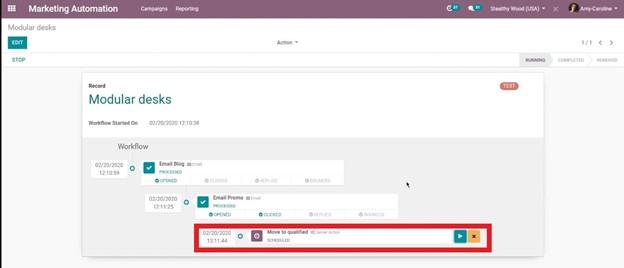
The Expiry Duration option allows you to create time-bound promotional activities, which will all be automatically discontinued after the Expiration date. After that, you can modify the Domain to even more effectively filter out your leads. This also allows you to study the nature of the leads' prior purchases or consumer behavior in order to send them promotional emails tailored to their needs. This is an effective technique to attract qualified leads to your company. 
To see the options listed above, click the space next to Apply Filter in the Domain section. Select the options to limit down your leads depending on your preferences. It will display the filter that you have applied under the Applied Filter sections. To save the complete method, click the Save button after you've finished configuring it. As illustrated below, the saved campaign will be available in the Campaign area. 
 
You may examine and adjust the newly created campaign by clicking on it, as shown below. 
The Workflow is depicted at the bottom of the page. You can have a more advanced setting by clicking the Edit button on the same page, which will bring up the editing choices. 
Here is where you may make changes to your Campaign form. You can add a new activity under the Workflow sections, and you can see an option called Add child activity under the existing activity, as shown below. 
When you click on it, you'll be presented with a new set of options, as illustrated above. Campaign and advanced mail management encompass all of these options. You must understand these settings in order to customize and use the functionality effectively. All of the features are focused on your prospects' actions in response to the emails or messages you've sent them. 
This can be thought of as an activity management command part. This section helps you to keep track of your leads' responses to the campaign information you've sent them. There are further alternatives such as Add another activity, Opened, Not opened, Replied, Not replied, Clicked, Not clicked, and Bounced for each possible action. Each one depicts the many actions that your mail may have engaged in with the leads. You can program the automated email system to behave differently in each activity. Click on the option that needs to be configured from the list, and a configuration page will appear, similar to the activity creation page. 
All of the setting choices indicated in the activity construct a section will be available to you. Configure the email and make a note that it will be sent to them in connection with the lead's activities. Select the activity type after entering the Promo's name. The trigger option is also available here. Select the trigger time and what produces the trigger, as previously specified. The name of the activity that you have chosen can be seen. Set the Expiry time and then go to the Domain part to set it up. You may filter down the leads under this as well, similar to what you did earlier.
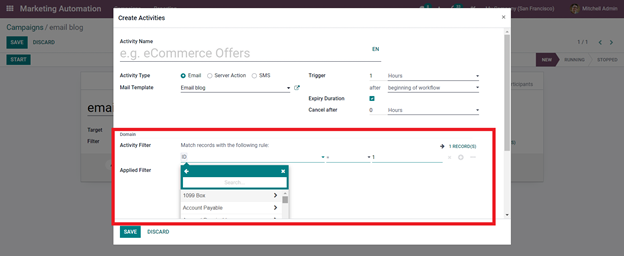
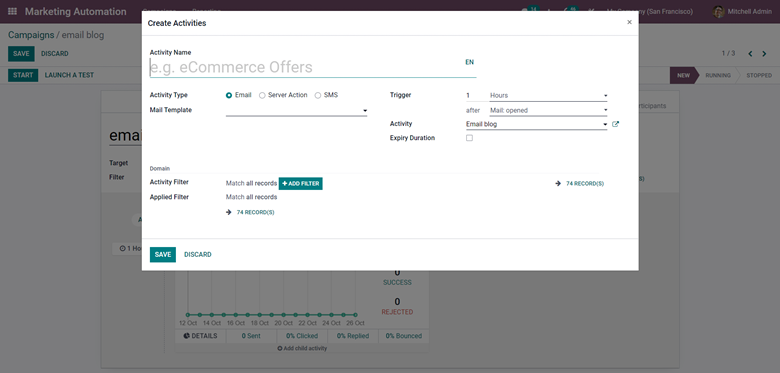
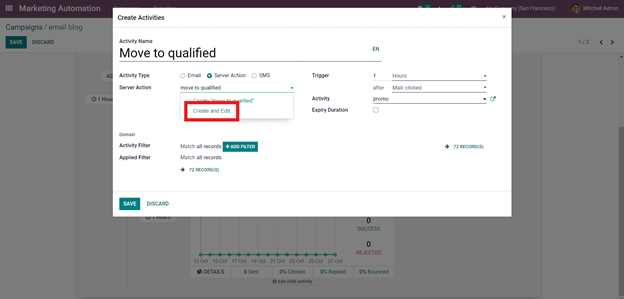
It's worth noting that limiting down your leads to the maximum number allows you to get a clearer picture of them and makes it easier to send the promotional program to them individually. To save the activity, click the save button after you've applied it.
 As demonstrated in the screenshot, after saving the activity, it will appear under the previously created activity.
The arrow pointing to the newly established activity can be seen above. Both activities are focused on leads, and to add a new activity to your database, go to the Add New Child Activity page and choose from the possibilities. To add a new activity to your database, do the following. As illustrated below, the standard configuration tab will be available. 
Click the Server actions button on the setup tab to mark the newly generated activity as a server action, which means it will not be communicated to leads or customers. Fill in the rest of the information in accordance with your company's marketing policies, as stated below. 
After creating the new activity name, choose Server action as the activity type because it is internal and not intended for customers. Creating a new server action may be found under the server action section. To configure the server, a new configuration page will appear, as seen below. 
Here you can set up the whole server action form.  Give the server action a name. Select the nature of the action from the drop-down box in the Action to do option before moving on to Data to write. To add a field to the segment, click the Add a line option under the field, as shown below. 
As indicated above, select the Field to add from the drop-down menu. The fields can be used to indicate the purpose of the newly generated Server action, such as selecting stage change from the dropdown options if the server action is for stage change. Set the record in relation to your server action purpose by selecting the Evaluation type from the drop-down menu. If the goal is to change the stage, you can select this option. To apply it to the field, look under Evaluation and select the qualified option under Record. After you've finished configuring, click the Save button to save your changes. 
You can configure the Domain again if you wish, but it is absolutely optional at this stage, and because internal server actions require less narrowing down, the filter is not required. To save the entire process, click the Save and Close button after you've finished configuring it. 
After you've completed the configurations, click the Launch a test button to run the activity as a test to review the newly generated activity. 
Click it to execute a test of the campaign before releasing it to the public. After choosing the Launch test button, you'll be taken to a confirmation page where you'll be asked to choose a customer and conduct the test, as shown below. 
As indicated above, click the Run button. Soon after, the customer will receive an email, which you can validate from here as it will be displayed after the email is opened. 
The opened button will light up to indicate that the mail has been opened by the customer. Keep in mind that all of these procedures are done out in accordance with the configurations' regulations. As illustrated below, the following step will immediately open for you to complete. 
The selection will change after you open send mail, as seen below. 
When the customer clicks on the mail, the option for the date and time of the customer's mail acceptance changes from Not yet clicked to the date and time of the customer's mail acceptance. To complete the process, click the run button again. You can keep going with the process as long as you have a certain amount of activities in the activities area. Following the procedures, you may check the modifications in the Marketing Automation module's dashboard under the newly formed campaign.
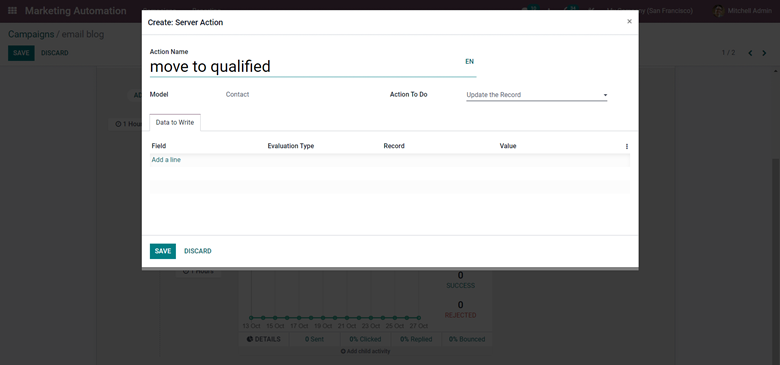
You may use the CRM module to get a detailed and comprehensive overview of lead management, as well as to look at your leads and efficiently communicate with them in order to maintain a strong link with them and convert them into customers. 
Odoo 15 Marketing Automation Module
Ismail Harake November 29, 2021
Share this post
Our blogs
Sign in to leave a comment
Odoo 15 Manufacturing Module Bill of Materials
  /